Showing posts with label Bargello. Show all posts

Friday, August 23, 2013

Pantone Fall 2013 Fashion Colors Acai and Vivacious

I thought I would start you off with clay recipes for two of the new Pantone Fall 2013 fashion colors, Acai, a deep purple and Vivacious, a rich fuchsia or magenta.  The two colors go really well together so make a great combination in the clay.  Purple is one of those colors that does not look good on me, no matter what shade.  I have learned, however, that when you are making jewelry and other accessories to sell, you need to consider the buyer and so we include this color in our work more as there are many purple lovers out there.
This is a bargello style scarf clip in the Acai and Vivacious color combo.


And here are the recipes for these two colors using Kato clay:

Acai
5 parts Mix #10-2 *
1 part Kato Silver

Vivacious:
10 parts Kato Magenta
1 part Kato Red
1 part White Mix #1-2*

*Note: These base color mixes are found in my Clay Color System Tutorial.

Thursday, July 18, 2013

Bargello Dish in Black and White

In my tutorial, "Building Bargello Motifs in Polymer Clay", I show how to create a bargello pattern in black and white (see  page 12).  I made a sample veneer sheet for the lesson but had not finished it into anything yet.  I had it sitting on a side table in our studio for some time hoping I would be inspired to finally making it into something.  I finally could envision what to do and here it is now as a ring/jewelry dish.


The texture I used to "frame" the piece is a Pixie Art Stamp called "Magic Mushroom" designed by Mike Breil.  Mike is Helen Breil's husband and just like Helen's texture sheets, Mike's are really fun to play with. 

After baking the dish, I added the silver/white highlights to bring the pattern out a little more.

Saturday, July 13, 2013

Bargello Fringe Necklace and a Ribbon

We had a nice time at the Artists' reception at the Shuswap Lake Festival of the Arts in Sorrento last night.  I thought I would share with you two of four items I had entered into the show both of which were jewelry items in the 3D category.

This is my Bargello Fringe Necklace in shades of black, grey and white.  This was a new design for me to create but it was inspired by the many "fringe" necklaces I was seeing everywhere and wanted to imitate that look and feel in the clay.  For added strength, I inserted sterling wire down the entire length of each "fringe" piece.


The other piece I had entered into the show was my "Emerald Forest" necklace which was a nice surprise to see a juror's ribbon next to it.


It was nice to receive a ribbon when there are so many other worthy artists to choose from.  There were 89 artists represented in the show with more than 250 pieces entered.  The variety of works ranged from paintings and fibre arts to sculpture and mixed media.

Thursday, July 4, 2013

Cell Phone Purse

I found this "Mini Clutch" bag tutorial some time ago and saved it to my Pinterest board.  I love Pinterest as it is such a neat way to organize the cool things you find on the web so you can actually find them again later!

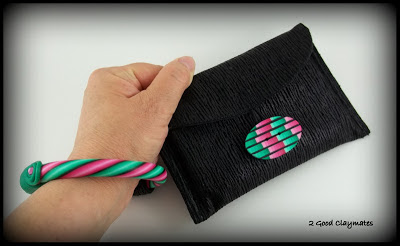
I finally got around to sewing one up for myself to hold my cell phone and a few cards, etc. Instead of adding the key chain I decided to attach one of my stripe blend bangles in place of a strap.  I used one of our coordinating bargello buttons for the closure.


I am one of those "matchy matchy" types that has to have everything coordinate and so here is a scarf necklace I made for myself along with the earrings and bracelet.


You can learn how to create your own bargello designs as well as the stripe blends shown in the above bangle with my tutorial, "Building Bargello Motifs".  When my scarf jewelry tutorial is finished (soon I promise!) you will learn how to make several styles such as using a bargello style.

Sunday, March 10, 2013

Stripe Blends

The blended stripes in these beads and bangles are made from the same color blends I use for my bargello motifs.  It is my own easy method for creating color blends and shading gives them an almost 3-D effect with lots of depth.  I share how to create this effect in my tutorial, Building Bargello Motifs, as well as how to make this bangle and the tube beads with built in bead caps.


Monday, March 4, 2013

Tutorial Toot - some shameless self promotion

The Chameleon Exhibit came to an end last weekend and was a great success.  It was a real honor to be a part of such an exciting event.  Going out to the Horizons retreat was another highlight to last month and is where I unveiled my new lesson, Building Bargello Motifs.


Everyone had fun learning this new technique and when I was showing them how to combine their colors and then arrange them into bargello patterns or motifs there was some real "ahhhs".


This is a fun technique where you can create your own clay veneer patterns and then use them in so many different ways.


It is a fun technique where I take you from mixing up your color blends (without have to do a skinner blend) and then creating your patterns with many different variations that can be applied.  Some of the people in the class told me they thought the technique looked too finicky for them but were so pleased when they were making their own bargello veneers in no time. 

For those who have already purchased my Clay Color System and are using Kato clay, I have included references to all the colors I used to create all the bargello patterns taught in the tutorial.


I  really enjoy teaching and sharing with others who are so eager to learn.  When I receive such wonderful feedback from someone who took my class or purchased any of my lessons it gives me a real sense of accomplishment.

One person who purchased my bargello tutorial wrote: "it is the best tutorial on bargello I have ever seen, including the needlepoint ones."

Another person told me "I really like your tutorials.  You write them in a way that I totally get it."

Other feedback I've received:

"This is my third tutorial from you.  Your tutorials never disappoint.  I always learn so many new techniques."

"Absolutely perfect. These tutorials are packed with information that is useful and easy to follow.  Thank-you so much for helping me learn."

"After searching the web for useful information on how to make buttons, I found this person on Artfire.  I ordered a couple of her other tutorials and they were so thorough and easy to learn from, that I ordered this one as well.  I am so thankful that I did!  This is a marvelous tutorial and if you want to make buttons... start here!"

"Terrific tutorial. Very happy with this purchase. Can highly recommend.  A+++"

Regarding my Color System Tutorial:  "Excellent tutorial.  Great way to learn about color and organize your clay stash."

Many people have also shared with me how my color system, especially has not only helped them learn about color but to help inspire them as well.  Maureen (Moe) shared on her blog how "sometimes you just wanna go play with your clay but you have no oomph and nothing in mind to make but you just wanna do something."

She has found that mixing up new colors and color blends using my clay color system really helps energize her with new ideas.  This is her desk with her color blend sheets she has created.  It is a fun way of coming up with new colors and blends.  You can read all about it on her blog post here.  I find her blog quite entertaining and sometimes a real hoot to read.


Look at these gorgeous blue cabochons she made.  They just look like real stone cut gems, don't they?


So if you are looking for some new clay techniques to try but want some lessons that are a good value for you money and that are fun and easy to learn, you can check out the many other tutorials I have available in my online store as well as my Etsy shop.

Monday, February 18, 2013

Bargello Tutorial Now Available

I am happy to announce that my bargello tutorial is finished and available in our Etsy shop as well as our online store.


Bargello is a type of needlepoint embroidery with the stitches all going in a vertical direction and arranged in mathematical patterns to create motifs.  Traditional designs are quite colorful consisting of many hues of each color which produces beautiful shading effects.

In my 25 page tutorial I show how to achieve unique color blends in the polymer clay and then arrange them to create your own bargello motifs.  Instructions for more than 10 variations are also included for different effects with more than 100 photos for easy instruction. 

This is a very easy method without having to make any skinner blends or reduce any canes.

I also show how to make several styles of beads with the bargello motif veneers to create stunning jewelry pieces.  Or you can use your veneer designs in many other ways.


As a bonus, I include how I use the same color blends to make my stripe blend tube beads and a bangle.   These beads have a unique holographic effect and almost appear 3-D with so much depth.


Monday, February 4, 2013

Bargello Veneers

I've been experimenting with various styles of bargello veneers for my tutorial and looking for inspiration from    bargello designs in quilts and tapestries to imitate in the clay.  I was quite excited when I managed to create this one the other day.


This piece is quite large actually (more than 5 inches across) so I have something special planned for it.

Getting excited about the Chameleon Exhibit which opens tomorrow.

Friday, February 1, 2013

Three color Bargello and Heart Brooch Pendant

This is an example of a three color bargello I will be sharing in my tutorial that will be available soon.  I created this heart brooch pendant and matching earrings from a veneer sheet that is shown below.


Thursday, January 31, 2013

Bargello Tutorial Coming

I've received many requests on how I create my bargello veneers.  I will be sharing how I do this at the Horizon's retreat in two weeks but am also working on a published tutorial that should be available soon.

Here are some samples of a two color bargello in the Pantone Spring 2013 colors of Emerald and Monaco Blue.  This is just a small part of what I will be teaching in my tutorial.


Wednesday, January 30, 2013

Adding a Signature Stamp Tutorial

This is another piece I made special for the Chameleon Exhibit.  I combined my bargello technique with the CaBezels by Wendy Orlowski.  I will be teaching how to create bargello veneers such as this one at the Horizon's Polymer Clay retreat coming up in two weeks.


We like to put our logo on the pieces we create using our signature stamps.  Sometimes it is difficult to add it during the "building" process without damaging the front of the piece before baking or sometimes I would simply forget so I have found a way to add it later.

I do this by first running some clay through a very thin setting on the pasta machine.  You want it thin enough so it doesn't stand out much on your piece but not too thin or it will tear when it is stamped.


You may need to use a mold release of some sort such as lightly dusting the clay sheet with some cornstarch or spritzing with water.  Make an impression in the clay with your stamp.  I sometimes do several at a time or you may have to do a few for practice until you get one with an even impression that you like.


Cut out around your stamp using a shape cutter.


Add a little bit of liquid clay to the back and position it onto the reverse side of your piece and rebake.


Wednesday, September 28, 2011

Bargello in Autumn Colors

This is one of our latest Bargello sets in some warm autumn colors.  I show how to make the cube shaped beads in one of my latest tutorials, "Make Your Own Rondelle Spacer Beads".


Lovely Leanne is modeling this set.  I love how it seems to come alive on her.  Can you see yourself in it?