Tuesday, May 31, 2011

Possible Postal Strike

Canadian postal workers have given notice yesterday to go on strike if they do not settle.  This could mean our postal system will come to a standstill as early as this Thursday.  As of today, we will not be sending any orders out in the mail until we know they have settled and the mail is back on track again.  This is a real inconvenience for not only us but for those who need to mail items to Canada as well.

In the meantime, we have deactivated all our items that require shipping in our ArtFire studio and Etsy shop except for our tutorials, since they are sent via e-mail and delivery will carry on as usual.

I haven't posted much these days as we have been busy getting ready for summer -- Here is a quick update on what has been happening:

These Kamloops Trout pins went to the Kamloops Museum gift shop to sell along with our Marigold Pins we delivered earlier.  The museum has a large section on the history of fishing here in this area which is very interesting.


We are making more buttons to go to some quilting and wool shops.  Here are a few sculpted flowers ones with wire shanks:


I'm making an assortment of blends for more bargello style creations that will go into the summer art show:  (I show how to make these six-step color blends in my Clay Color System Tutorial.)


And these little buttons are for something special -- I will show you more on this later -- with a free tutorial coming up!

Wednesday, May 25, 2011

The Fashionista Ball - Blog Debris Day

If we were still living at the west coast, I know where I would be this coming Sunday!  I would be attending The Fashionista's Ball!

This is an incredible event where more than 3000 items have been donated to raise money for charity.  These items consist of original artwork, high fashion clothing, shoes, jewelry and accessories all in mint condition and for sale at a fraction of the original price and 100% of all the money raised goes to the United Way.

Here are a few of the items that will be for sale and you can check out their facebook fanpage to see more.


They even give tips for shopping on their site that you can read here.  Each person is given a large red bag to carry for their items which can be later purchased.  It is a group fitting room and so is suggested to wear your "Ninja Shopping Out Fit" consisting of smooth fitting t-shirt and tights so items can be quickly tried on over your clothes.  Sounds like a real aerobics work-out at the same time!  It will be a mad house I'm sure as the first 300 people to make a purchase will receive a Goody Bag!

Sunday, May 22, 2011

Back from our Etsy Artisan Show in Westwold

We had a great time at our Summer Artisan Show in Westwold yesterday.  We were so exhausted after so much talking and visiting.  Here is a photo of our set-up.  We are finally getting things more streamlined so set-up and take-down is smoother and quicker these days.


It was fun meeting a lot of our on-line friends that were there along with other Etsy sellers in our area we hadn't discovered yet.  There was a variety of artists which made the show very diversified.

I managed to get a few photos in between customers and visiting.  This is Ellie from Felt The Fluff.  She organized the show and got all of us together.  She does sculptural needle felting and her polar bear family is so adorable!


This is Deb from Paxton Valley Folk Art.  Her space was across from ours and was really great getting to know her and see her beautiful handmade creations.  She also sells patterns for her original designs as well as fabric flowers like the daffodils shown here.


This is Bryan from Bras Art Gallery who was right next to us.  He does pencil and graphite pencil drawings that are just out of this world.  He was working on a ballerina drawing throughout the day and was so inspiring to see it take form.


Bryan's wife, Siana of Sinderblu Studio, was next to us as well but I missed getting a photo of her.  She makes beautiful hand embroidered cards as well as does gorgeous hand weaving.


This is Linda of Views by Linda Photography.  She is a talented photographer and her photographs are amazingly beautiful.


I picked up this cute messenger bag in denim and vintage paisley fabric from Christine of CW Designs.  Her Etsy shop is called Christines For Tea and she makes all sorts of hand-sewn items.


And this is Sophie from Lili Simone Designs.  I was having fun kidding her about whether she was working hard or hardly working!  lol!  


It was also great to see one of our Okanagan Etsy group leaders, Becka of Gingerurchin, come out to support and visit with everyone.  

All in all, it was a great day and we are looking forward to another event such as this one!

Thursday, May 19, 2011

Summer Artisan Sale in Westwold

We are fortunate to have found an Etsy Artisan group where we are all located in the beautiful Okanagan area here in British Columbia.


One of the cool things about belonging to such a group is that we can actually get together and meet rather than just connecting over the internet.  One of these occasions is happening this weekend in a little town called Westwold.

One of our members has organized our very own Etsy Artisan show and sale  this Saturday (May 21).  We are looking forward to a great time with making new friends and getting to know some of our fellow artisans.

It is going to be a great weekend as Westwold is right next door to the town of Falkland where they are having their famous Stampede Rodeo.  We will have our Country Charm collection available as well as our buttons, shawl pins and other new pieces we've been working on.

Saturday, May 14, 2011

Ebbtide Series

I love playing around with our "snail-like" pieces from our Ebbtide collection.  We're now making them into buttons and here is a sample of a few that will be listed in our Etsy shop soon.


We are taking a short break to regroup and organize so our Etsy shop and ArtFire Studio will be closed for a few days.

Wednesday, May 11, 2011

Filling Metal Filigree Frames

This is an antique bronze metal frame I decided to fill with clay for a pendant.


I just used a scrap piece of mokume gane left over from another project that just seemed to work for me. This is actually the same mokume gane I show how to do in my Clay Color System Tutorial.


My Fabulous Faux Turquoise tutorial is more than just a lesson on how to make a natural looking turquoise.  It also includes a variety of basic jewelry making techniques such as how to fill metal frames or bezels without requiring any glue to hold them.


Any type of glue will eventually break down over time and if you can secure your pieces by using the clay itself, your piece will be much stronger and less likely to fall apart after several years of use.

In my tutorial, I also show you two methods on how to make your own beads in consistent sizes.  One method is using a clay veneer sheet and the other using cane slices.  You also learn how to create your own cabochons to coordinate with your beads.


And last, you will also learn how to make your own clay "headpins" to use as dangles and accent pieces for your jewelry.


Monday, May 9, 2011

Round and Round We Go...

I find lentil swirls so mesmerizing and it seems once you get the hang of making them from polymer clay, you are hooked for life!

We finally found a new use for our lentil beads and are now creating a whole new line of Candy Swirl Buttons.


I've been working on my technique so I can cut my lentil swirls in half and embed our handcrafted wire shanks without distorting the swirl pattern and yet also maintaining a consistent size and shape.


I've also been experimenting with different effects on our swirls like in the ones shown below.  The swirl button on the left was carved and then backfilled with clay and the swirl on the right was carved and then highlighted with acrylic paints.  I really like the backfilled one but took a lot more work and elbow grease when it came time to sanding -- but then again -- that is what I have my claymate, Dave for!  He keeps saying he is more than just a pretty face and when it comes to times like these I have to agree with him!  lol!


Which effect do you like best?

Sunday, May 8, 2011

Happy Mother's Day

I don't make my geckos as much as I use to these days except for custom orders.  This set was specially made for a mother's day gift by special request in a rich denim blue.


Happy mother's day to all the moms out there and hope you are having a special day.

Friday, May 6, 2011

Marigolds in time for summer

We just finished off another order of marigold pins for the gift shop at the local Kamloops Museum.  The marigold is the official flower for the city of Kamloops and they are planted every springtime in the downtown area.  It's a real honor to know that this little souvenir carries our work to all corners of the world.


Thursday, May 5, 2011

More Rondelles in Stock

I'm finally caught up (for now) with making more rondelle spacer beads and have my new colors now listed in our ArtFire Studio as well as our Etsy Shop.


It seems we are always running out and is hard to keep these little babies in supply.  I like to organize all the rondelles and cube spacer beads in a drawer in little containers.  I don't know if our drawer has looked this full in a long time!


If you are interested in making these yourself and have never worked with polymer clay before, my tutorial, "Make Your Own Rondelle Spacer Beads" is just for you.

And I have some yummy color recipes for using Kato clay that are perfect for making these beads.


If you want to learn how to mix up your own colors and blends and a cool way to organize them, you will learn all that and more from my complete Clay Color System.


Even if you are an experienced clayer.  I have received comments from people who have purchased my tutorials saying they are clear enough for most beginners to understand yet enough tips and other information that a more experienced clayer would appreciate and enjoy.

Wednesday, May 4, 2011

Mini Tutorial - Filling Bead Frames

I've been wanting to add a few belts to my wardrobe and this is the first one I made that coordinates with my Bargello style set from our Chianti Collection.


I found these cool Tibetan silver metal bezel frames that combine beautifully with clay and I show how to fill them without any need for glue in my Fabulous Faux Turquoise tutorial.


We import the frames from Hong Kong and I've had a few people ask if I could sell them so I've made these and a few more of our favorite pieces available in our ArtFire studio.

The other cool pieces I like to use and work great as belt links as well as other jewelry pieces, are the little bead frames and connector links.  These come in all sorts of shapes and sizes and are meant to string as is or with a bead inside them.  But rather than use them plain or with any average bead, I like to fill them with clay, making them more special.


I will show you how to fill some simple round type frames and you can then add your own special touch to it later.

This is a round connector link that I used in the belt design I showed above.


Step 1 - Roll a ball of clay that fits nicely in the center with a little space around it.  I experimented with several clay thicknesses and shaped cutters until I found the right combination for this.


Step 2 - Hold the ball of clay that is still inside the frame, between your thumb and finger and squeeze the clay ball until it fills the frame equally on both top and bottom.  Squeeze a little more until the frame becomes slightly embedded into the clay.


Step 3 - You can leave these nice and smooth or you can texture them.  Here I am using a nylon dish scrubbing pad to texture both sides at the same time.  Spray your bead and the scrubbing pad with water and place your bead on one end or piece of the scrubbing pad and with the other end, apply enough pressure to texture your bead but not flatten it too much.


Here I am doing the same thing but I am using a rubber type texture sheet instead.


Step 4 - You can leave your beads as is or you can accent with paints or mica powders to antique or add more contrast.


Here are some samples of bead frame connectors I filled:

Top row:  texture sheet with mica powders,  texture sheet black acrylic paint
Middle row:  scrubbing pad texture with mica powder
Bottom row:  scrubbing pad texture,  plain black with no texture


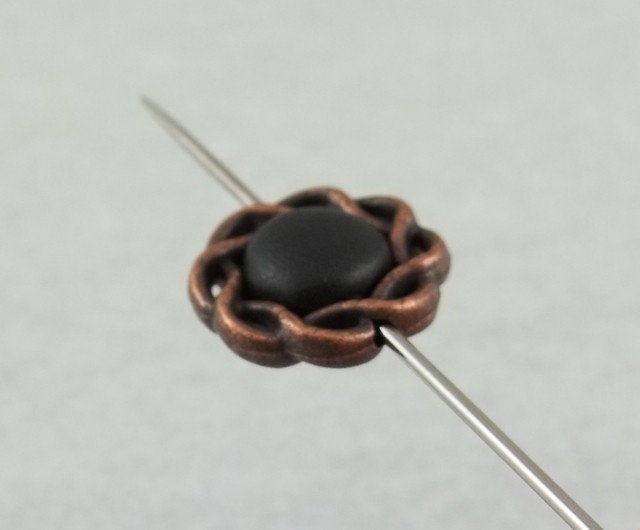
Variation:  This is a smaller bead frame that has a large hole in the center for adding a bead and a hole that goes through sideways for threading.


I fill this frame the same way as in steps 1 and 2.  After the clay is embedded into the frame, I insert my needle tool through the frame and clay center leaving it in place while texturing.


Samples:


I will show you more types of bead frames and variations later.  Hope you enjoyed this mini-tutorial