Showing posts with label signature stamp. Show all posts

Wednesday, June 16, 2021

Custom Name Stamps from Shades of Clay

My custom name stamps arrived from Shades of Clay a little while ago.  Since my studio was still not set-up after moving I didn't get the chance to try them out until just recently.  The cool thing about these stamps is that you don't just get one signature stamp but can have your stamp made 7 different ways!  Here I have my heart logo in several sizes as well as my name.  It is nice to have the flexibility to use them in various ways.

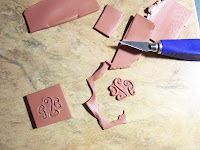
The first thing I did was cut the stamp sheet in strips crossways to separate the stamps for easier use.  One tip is to be sure not to trim the edges as this gives you something to hold on to while impressing (see photos below).


I really like the tin that is included to store your stamps so they don't get lost as they are quite small.

One thing that amazed me was how they such a small stamp can give such precise results!


These stamps work great on the clay but I also intend to use them on my other artwork which I will share with you a little bit later.

Click here to order your stamps from Shades of Clay which is a limited time offer. 

Wednesday, January 30, 2013

Adding a Signature Stamp Tutorial

This is another piece I made special for the Chameleon Exhibit.  I combined my bargello technique with the CaBezels by Wendy Orlowski.  I will be teaching how to create bargello veneers such as this one at the Horizon's Polymer Clay retreat coming up in two weeks.


We like to put our logo on the pieces we create using our signature stamps.  Sometimes it is difficult to add it during the "building" process without damaging the front of the piece before baking or sometimes I would simply forget so I have found a way to add it later.

I do this by first running some clay through a very thin setting on the pasta machine.  You want it thin enough so it doesn't stand out much on your piece but not too thin or it will tear when it is stamped.


You may need to use a mold release of some sort such as lightly dusting the clay sheet with some cornstarch or spritzing with water.  Make an impression in the clay with your stamp.  I sometimes do several at a time or you may have to do a few for practice until you get one with an even impression that you like.


Cut out around your stamp using a shape cutter.


Add a little bit of liquid clay to the back and position it onto the reverse side of your piece and rebake.


Tuesday, February 24, 2009

Signature Stamp Tutorial

A few weeks ago I said I would share how I made a signature stamp so I'm finally getting around to it.  You can use this method to create other types of stamps as well.  

Start with drawing out your design on some tracing paper.  If you are doing anything with lettering such as our logo as  shown below, you don't have to worry about reversing them because the stamp will create the same image as you are drawing.

1.    2. 

(1) On a thick sheet of clay pressed onto a tile so it doesn't slip, place your drawing over the clay and lightly trace over the image with a pointed tool to create a light impression. 
(2) Pull the paper away and with your tool, go over the impression several times to make a deeper impression.  Try to use the same pressure so all of the impressions are of the same depth. 

3.    4. 

(3) Trim the excess clay away, leaving the carved piece on the tile to bake.  Bake following your clay package instructions.  After your piece is cooled, sand it with wet/dry sandpaper until it is smooth and level.  You have now created your "mould" to make your stamp.
(4) Now take a medium-thick sheet of clay and press the clay into your mould to create a reversed image.

5.    6. 

(5) Press this piece of clay onto a ceramic tile and carefully cut around the letters.  Do not remove it from the tile or it will distort and bake this piece.
(6) Shape a piece of clay and attach it to the back of your stamp to make a handle.  Bake this piece again.

7. 

(7) You may need to lightly sand your stamp to make a smooth impression (which naturally I have not done yet here!)  Anyhow, Voila!  Your stamp is now ready to use!