Tuesday, August 31, 2010

Making Beautiful Buttons Tutorial is Now Available


My other new tutorial, "Making Beautiful Buttons" is now available!

Making buttons can be so much fun and are useful for so many things.  As a sewer, I can create just the right button in the color I want for my project.  I have even replaced most of the buttons on my store bought clothes with my own handmade ones.

This tutorial covers the basic construction of several types of buttons, including textured and moulded.  I show you how to make your own wire shank and include templates you can copy with an easy foolproof method for marking your buttonholes so they are perfectly centered every time.

The buttons shown in the photo are examples only.  This tutorial shows you how to transform your own original clay designs into functional works of art.


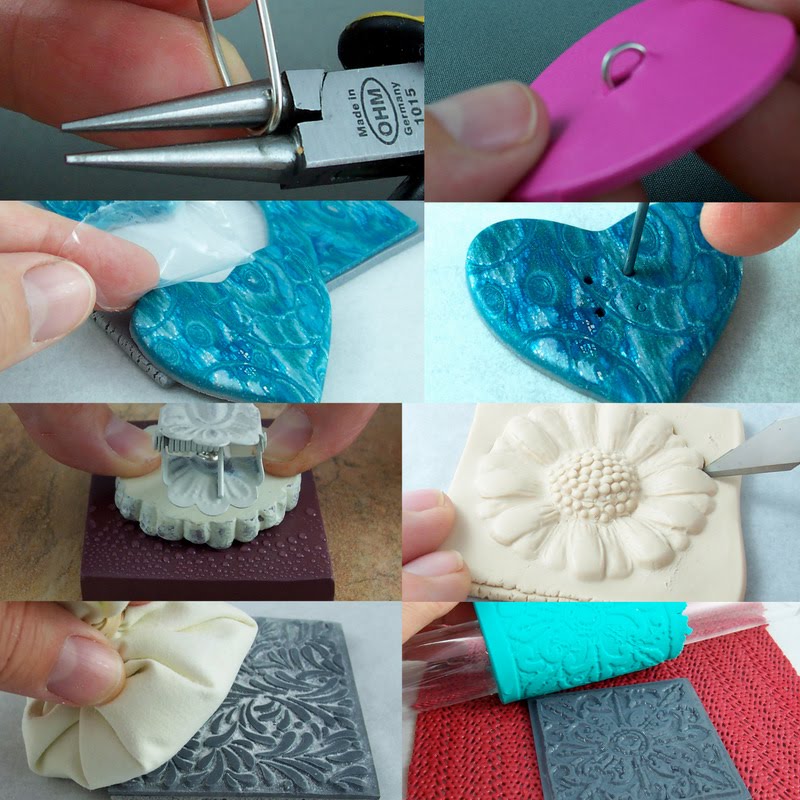
It consists of 20 pages broken down into 58 steps with more than 50 photos for clear and easy instruction.

You will find this tutorial for sale in our ArtFire Studio as well as in our Etsy shop.

Sunday, August 29, 2010

Some New Buttons and Tutorial

I just listed some new buttons in our ArtFire Studio and Etsy shop.  I was busy experimenting with different styles for another tutorial I've been working on for the past couple of weeks.


The tutorial is on how to construct nicely formed and beautiful buttons using your own clay patterns.  I also include in the lesson how to make your own wire shank as well as have perfectly centered holes every time.  It should be available in the next day or so....

Thursday, August 26, 2010

Texture Tube Variations

I've been working on some new design variations using the Textured Tubes & More tutorial.  One is this curved focal bead.


The other is a textured bangle bracelet.  This one has elastic strung through it with some rondelle spacers.  I'm not really fond of the color on this one but it is only a prototype.  I made it out of an ugly mud brown scrap clay to see if it was going to work.  I was messing around with some inks afterwards to give it a little color and this is what I got.


I decided the size and design works well for me though.  Dave's cousin was visiting and she was admiring our solid type bangles but they wouldn't fit over her hand.  She slipped this one on easily and  loved it.  I'll work on this design and show the results later....

Tuesday, August 24, 2010

Textured Tube Necklace Designs

Had some fun putting this collage together featuring some beaded necklace designs using the textured tubes for some inspirations... They also make gorgeous bracelets!  All the color recipes for these beads are included in our Textured Tubes & More tutorial.


Monday, August 23, 2010

Clay Artist Feature - Beth

I received a feel-good e-mail yesterday.  Beth from San Diego shared some photos of work she had done with some of our tutorials and I must say I was very impressed!

She made some really nice beads from the Extruder Swirl Cane:


And here is a necklace she created with those beads and some of the clay rondelles.


She also made more necklaces using the clay rondelles and seed beads as spacers.  I love how they turned out!  In the first design she used a copper button clasp and copper seed beads between each rondelle.


I love the terracotta and copper combined with the turquoise in this one....


She says that she likes making the rondelle spacers while watching TV like I do as it is the perfect thing to do and relax at the same time.

What surprised me the most was when Beth considered herself an amateur and doesn't sell any of her work yet.  I'd say she is at least on the right track and we are looking forward to seeing more of her work in future!

Saturday, August 21, 2010

Textured Tubes & More Tutorial Now Available

I've had many requests on how to make our textured tube beads and pens and we now have a tutorial available for sale on ArtFire and in our Etsy shop.


In this tutorial you will learn to make tube beads with rich textures that are totally seamless!  I will also show you how to make larger focal beads (including the end caps) as well as covering pens and other tube shaped objects with this same technique.  The nice thing is that there is no sanding involved yet your pieces will have a silky smooth finish.

I've included a color guide and tips for using mica powders as well as texture ideas to use for your new creations.  As a bonus, I have added a color recipe sheet where I share with you how I achieve some of my favorite designs.


This tutorial consists of 18 pages broken down into 49 steps and includes more than 50 photos for easy and clear instruction.

This tutorial is also be available at Clay Lessons.

Friday, August 20, 2010

Rendition of the Extruder Cane

We are requesting anyone to share their creations from any of our tutorials or handcrafted beads.  Dana Jones sent us some photos of several pendant and earring sets she created using the Extruder Cane Tutorial I want to share with you.  If you click on the last photo it is linked to her Etsy Shop called Smiley's Designs.


We have received a lot of positive feedback about this tutorial and it is definitely a lot of fun and addictive!  A PDF version is available on Clay Lessons if you want to download it for free, all you have to do is register with them.

Thursday, August 19, 2010

Looking for items to feature...


We have seen a lot of traffic over the last year checking out the many free tutorials we have provided (you will find all the links to them at the top of this blog).  Have any of you created pieces using any of our tutorials and would like them featured here?  We would love to see what you have made or how we  inspired you and share them with others.

The same goes for our handcrafted beads and buttons.  If you have made something with them and would like to show off your creation, we would love to feature those as well.

Feel free to leave a comment with a link or e-mail us direct with photos and we will post them here.

Monday, August 16, 2010

New Look

Last weekend our followers reached 300!  I wanted to do the happy dance and celebrate!

We hope you have been enjoying our blog so far and we will try to continue to share with you more of our latest work and some fresh and new ideas.

I decided that since our home studio now has a new look that our internet studio (blog) needed one as well.  Other than the new color you will notice the sidebar has changed.  We didn't get rid of our favorite links but just moved them into a better place.  They now have their own page in one of the tabs at the top.  I categorized them in different interest groups so they are easier to find.  There is room to add a whole lot more which we will be doing over the next while.

I have enjoyed working in our new finished studio this past week.  At the moment I'm writing several new tutorials that should be published shortly.  I've been also working on some new color palettes for our beads and jewelry.  We have the small rondelle spacers in our basic color palette available for sale but we will soon have them available in a larger size as well as in more color choices.

This palette is in the Pantone Fall 2010 colors of Purple Orchid, Lagoon (turquoise), Woodbine, Endive, Golden Glow, Living Coral, Lipstick Red, Chocolate Truffle and Rose Dust.  I am in the process of mixing up some of these gorgeous fall color combinations into some of our new bead and jewelry designs.


This is our new jewel-tone color palette of lime green, teal, blue, grape, magenta, orange crush, melon, sunshine yellow and almond.


And here is a sample of some new lentil swirl beads in a combination of the magenta, melon, sunshine yellow and lime green now available for sale in our Etsy shop and ArtFire studio.

Thursday, August 12, 2010

Studio Redo - Finally Done!

Except for one wall that needs a coat of paint (I want a second color), here is the studio now finally finished.

We now have 3 work type tables and a display area in the room.  The first table here is our beading and finishing table.  I finally made room for my sewing machine so I wouldn't have to pull it out from a cupboard each time I want to use it.  The photo light box is on the table I showed earlier at the one end.


This is the main clay table.  The little bookshelf to the left holds more containers full of canes and other stuff.


This is our second clay table with the glass top.  We use the front half as part jewelry display.


Another view of the 2 clay tables from the entrance of the room.  Also a mini display area that can be easily taken apart to use in any shows we are in.


The white wall showing is the only one I didn't paint yet.  Still deciding on the second color -- most likely a type of burnt orange or green.  All this is in a 11' x 11' room so is amazing what can fit!  It may appear a little crowded when in fact it feels quite open and there is a lot of room to move around.  Dave and I feel we can both be together in there and not trip over each other any more.

Wednesday, August 11, 2010

Studio Redo - Tidy Up!

I've been sharing a couple of pieces from Ikea we have been using in our studio and while googling a few things I came across some "banned" Ikea commercials.  Some of them I can understand why but there were a few good funny ones...


I sometimes feel like the girl in the commercial -- Dave says it is maybe a good thing I didn't have any kids of my own!  ha!  I recently purchased a new bulb for one of my Ott Lights.  I put the light away for safe keeping until I reorganized the studio.  The place must be really safe as I cannot even find it now!  I'm sure it will show up some day when I'm not even looking for it and searching for something totally different.

Anyhow, I thought I would share a couple more Ikea pieces we have that work great in our studio.  We had this cabinet in our other home but I quickly laid claim to it for our studio when we moved.  Because it is so tall and narrow it takes up such little space yet if fits a ton!  What I like about it is that it comes with all these shelves that are adjustable and of course I happened to have more baskets that fit perfectly!   A plastic drawer storage unit fits perfectly into it as well and I can keep all sorts of junk in there!


I also love the two drawer units on wheels that fit under the countertops.


We use one for storing our handcrafted jewelry so it is nicely organized when we need to find something or someone comes to visit.


The other drawer unit is for storing our bead stash.  We have these bead trays we purchased from a bead store which are great and didn't cost too much.


I found though I like the stacking plastic containers that screw together from the dollar store much better.  Instead of stacking them, they work really nice in drawers (or baskets) as little dividers for your beads and findings.


I will leave you with a link for another fun Ikea commercial!  Another favorite of mine!

Tuesday, August 10, 2010

Studio Redo -- Improvising

Our clay table is a little unusual but works for us.  We placed a formica countertop (from Ikea) onto two metal wire shelf units.  We inserted pieces of nonslip shelf liner between the poles and countertop to prevent it from moving and adjusted the shelves to fit some baskets we purchased from the dollar store that work like drawers.  We had several rubbermaid type drawer units that fit perfectly as well.  Voila!  Instant desk.  Because the counter is formica I can use it for claying on and don't need a special mat or glass board.


Here is how I store my mixed clay colors.  Each one is wrapped and then kept in snack size ziplock bags and tagged with the color number that coordinates with my color recipe book.  Dave teases that there is a little of Mr. Monk in me and I think he is right! lol!


We were in need of a proper table to hold the photo light box we purchased a little while ago.  I then came up with using the same idea as our clay table.  Fortunately the same shelves were on sale at half price so was good timing.   We just placed some particle board on top this time which I will probably cover with some cloth later on when I have more time.


I then added more baskets and drawers below for more storage.  We can keep our camera accessories and photo props close at hand.

Monday, August 9, 2010

Studio Redo -- Storing Canes

When we moved to our new home we bought a new table from Ikea for the studio which is my favorite piece of furniture.   I use to store all my claying accessories under the glass but decided they work much better in the new drawer units on our clay table and we are now using the space for storing some of our clay canes.  They are arranged on trays that slide out like drawers (I glued little felt dots underneath them).  The canes are a little messy right now and need to be reorganized but they do look so colorful under the glass and show off well.


Sunday, August 8, 2010

Studio Redo -- More storage Ideas

I found these storage drawer units in the hardware department in Walmart and they were just what I wanted for the clay table.   I can have all the little pieces I use for claying handy and organized.  I use them for holding all my rhinestones, shaped cutters, small moulds, templates and such.  They can be stacked on top of each other or placed side by side which makes them so versatile.


The drawers even have removable dividers so you can fit more than one item inside.  This storage unit would also work great for storing your canes since the plastic doesn't react (I tested it) but I found a different home for those -- will share that with you tomorrow...

Saturday, August 7, 2010

Studio Redo -- Storage Bins

We have been busy with rearranging and practically redoing our studio this past week.  When we moved into our new home almost two years ago the studio seemed just perfect for us.  You can see a posting of it here.

We are getting more visitors now and need the extra space so we can fit more than two people without bumping into things.  Before we unveil our new room, I thought I would share with you some of the new storage and work area ideas we came up with.

I found these cool bins the other day at Home Depot.  They are so versatile as they can be stacked or  hung on some of the wall brackets provided.  There are eight in a package and I liked them so much and found more uses for them we went back and bought another set.


We hung some of them on the brackets under some shelves along the beading and finishing table.  They are perfect for organizing pieces that need sanding, buffing, glazing, etc.  These replaced the yogurt containers we use to use that would sometimes pile up everywhere.


The other set of eight are in use at my clay table.  They fit perfectly on some adjustable stacking shelves and I have some of the necessary items close at hand like my stamps, inks and textures, etc.


Tomorrow I will show you some more new ideas we came up with ...