Friday, January 31, 2014

More Faux Wood and Leather

After making the buttons in our new faux wood and leather, I decided to play with it a little more and see what else I could do with it.


Here are some scarf clips in two different shapes.  I just listed these in our Etsy shop.


The spring loaded scarf clip ring is available at Shades of Clay and I have a free tutorial on our blog (click here) on how to attach them as they can be a bit tricky.

Here is the same technique and pattern in a shawl pin.


The texture sheet we used to make these items is a favorite of mine.  It is a design by my friend, Wendy Orlowski, called Feather Boa and is available at Shades of Clay.

You will notice a difference in the two shawl pins shown.  The one on the left was made by impressing the clay from the texture sheet.  The one on the right was made from an inverse texture sheet I made from the original.  I discovered that the inversion texture created an "innie" that when antiqued with acrylic paints afterwards gives the more tooled leather or carved wood look.


Thursday, January 30, 2014

Matching Colors

One thing about polymer clay is that once you are hooked, you start looking in all sorts of places for items you can use as tools or for adding textures. Several years ago I found this toothbrush holder and decided to use it on my table to hold some of my clay tools.  I was staring at it one day and wanted to see if I could replicate the pattern so played around and made a texture sheet from clay. 


I was using it to make some of my textured tube beads like the ones below.


Now, several years later, I decided to pull out my texture sheet and see how it would look as a button. "Antiquing" them with paints gives them a carved wood or tooled leather appearance.


I love the rich brown color of these but was thinking of experimenting with other colors.  Then I had a request from Donna's Yarn & Craft to match the teal blue color of this skein of yarn for a sweater that Elsie, Donna's mom and store partner, is knitting.


I really love this color and got carried away with making extra buttons in a variety of shapes and styles.


Wednesday, January 29, 2014

Colorful Toggle Buttons

After making a lot of buttons in brown tones for the past while, I was happy to be mixing up some bright colors again.  These colorful toggle buttons are the small mini type, or as Dave likes to call them, "toglets".  They are a result of another custom request from one of our stores that sells our work.  I was discussing with Donna of Donna's Yarn & Craft in Kamloops about making some toggle buttons and wanted her input.  She showed me a small toggle they had in a plain bamboo and wondered if we could make something similar but in different colors.  She was receiving a lot of requests for these for children's wear and especially for boys.

After working out our technique, the little "toglets" were created in a variety of colors.

Mini toggle buttons or "toglets"


We used a few of the Pantone Spring 2014 fashion colors, Violet Tulip and Placid Blue.  The other colors are favorites from our color system collection.  These mini toggle buttons are now available at Donna's Yarn and Craft in Northshore, Kamloops.

We are also making some new sample color chips for a few of the stores we do custom work for.  This will make it easier for them and their customers in selecting their button colors to match the yarns or fabric they are purchasing.

color sample chips for buttons

Monday, January 27, 2014

Custom Work

We find inspiration for creating our works in many ways - our beautiful natural surroundings, taking a workshop or tutorial, through many hours of repetition and when we are forced outside of our comfort zone to do commissioned or custom work.

We find now that much of our work has to be done on a deadline.  We deal with over 15 stores that sell our work now and we try to see them at least twice a year.  This means we have to show them fresh ideas each time.  We really try to have as much as possible, unique designs for each of the stores we sell to that come from the store owners' input.

We also do many custom orders.  At first we were wondering if it was worth our time and effort  and at times we found maybe it wasn't but we always found one idea lead to another.  Sometimes an idea opened up that we had never thought of before resulting in a best seller.

Most of my inspiring work has come as a result of being forced to explore an area of my mind where I hadn't been too much before.  Because my mind isn't the same as my customers', I enjoy getting inside their ideas and creating something that I never would have thought of.  This always helps me expand my horizons.  For example, when I started 10 years ago, most of my bead-work was in the color green.  I didn't realize this until my husband pointed it out to me.  We then started adding some of his colors and then our colors.  I guess working together has opened me up to the idea of working with our customers as well.

Another good thing about doing custom work is that it is already presold and because we have collaborated with the buyer, we know it will be very much appreciated.  Making that special art piece for someone really increases one's artistic self-esteem.

One good example is when we were asked to make a special button that would go along with a new line of fabrics.  I was given little swatches for color samples and told to make a design featuring the landscape of the Kamloops area.


I had no idea as to what the fabrics really looked like as it was kept a secret until the "unveiling".  I wanted to create a scene where we could make quite a few buttons in a similar pattern but where each button would come out somewhat unique.  I experimented with a stacked mokume gane technique and created some samples of a summer type scene representing the Thompson Rivers Valley and the unique dry hills surrounding the area.


After proofing and okaying each stage, via e-mail, I was given the final approval, with much relief.  But then I was asked if I could make some more, but this time create a winter scene?  So back to the drawing board and with some tweaking and adjusting of colors a winter version was born.

Kamloops Button
This button has turned out to be our best single selling item ever.  It is something I could not have seen myself doing without being asked.  It was a struggle both time wise and creatively but I am ever so glad that I was pushed into it.

Kamloops Button - summer scene bag

Kamloops Button - winter scene bag

Saturday, January 25, 2014

Inspiration

It's January and after doing the mundane things like stock taking and doing year end, we find that we do have a small window of time to try new things that have been buzzing around in our heads for the past year.  When I hear about my friend, Wendy Moore, in Australia having to live through searing heat and brush fires every year at this time or other friends like Cynthia Blanton and Helen Breil who live in another part of our country,  are putting up with freezing temperatures and heavy snowfall, we feel so blessed to be living where we do.

We've lived here for 5 years now and the weather pattern seems to be similar each year with no major storms to speak of.  December cold temperatures and snow and January with acceptable temperatures and more snow.  As I look out my kitchen window, I see the lake is not frozen and most likely won't this winter.


We are nestled in a valley between 2 mountains which protect us mostly from strong winds.  We don't find it very difficult at all to get inspiration from our surroundings.


One neat feature of the area of where we live is that there are 200 lakes all within a 2 hours drive of us and they are all teeming with fish.

Probably the most interesting feature, is that every year the Sockeye Salmon come to our area to spawn and every fourth year they come in the millions.  I believe it is the largest Sockeye salmon run in the world (except for some place in Russia).  We will again be involved in the Art Festival surrounding the salmon run this October where over 100,000 tourists come to see this big event over a 4 week period.  This really is a unique occasion since many of our 3,000 residents of our town are involved as well.


We will be making many small pieces of salmon themed art work to sell during this time.  We have to think of our designs now as this may be the only large chunk of free time before the event.  Although it has been in the back of our mind since the last one, (more than 3 years ago), it is unique because we normally don't sell the salmon themed pieces at any other time.

So why am I talking about this now?  It takes away from our regular routine, as I say it only happens every 4 years and we are forced to think of what will sell to these tourists and at a price point where they will sell quickly.  Also, if last time was any indication, we will have to be more prepared and make dozens of each design which are basically the same.  This is a different approach for us as we pride ourselves on making unique and individual pieces.

Four years ago, we found that every second day we had to replenish our supply again and again.  This meant long hours doing pretty much the same tedious duplication of pieces we had already designed.  We don't like to work on a deadline but when it was all over, we found that it was well worth the effort both financially and creatively.  Forcing us to produce on a deadline with an assembly line style, we came away being able to produce larger amounts of other items such as beads and buttons in a shorter time period.  This became the basis of an increasingly successful wholesale business to yarn and quilt stores.

Wednesday, January 22, 2014

Faux Wood and Leather

We just added some new designs to our button collection that have a wood or tooled leather look.  I've been wanting to work on this new project for some time but when we started getting requests from the wool shops it was the jump-start that I needed to finally get at it.

These are quite a change from the bright Pantone colors I've been mixing up, but is nice to create something different.  Right now we are making enough of these for the stores that sell our buttons as well as our Etsy shop.

We do quite a bit of custom work and plan to write a future blog post on the joys ???? of doing it.


Zipper Charms


Toggle Buttons

Tuesday, January 21, 2014

Mixing it Up

It is always fun to see what others are doing with the new Pantone color recipes I shared earlier.  These are some fun cane pieces on Wendy Moore's clay table in Dazzling Blue, Cayenne, Celosia Orange, and Freesia.  She added some turquoise which I think makes a great addition to the mix.  Wendy does some fabulous work and is planning on making some necklaces with these pieces so I can't wait to see what she creates!

Clay pieces by Wendy Moore
Check out her blog and see her fun "bodacious babes" she has been making.  Enter her "Word of the Year" challenge and you could receive one of  her amply endowed Annies.

Thursday, January 16, 2014

Personalized Textures

I've been experimenting with making some of my own texture sheets.  This is something I've been wanting to do for a while but just didn't have the time.  Here are two new designs I've made so far, used to create some scarf jewelry and earring beads.  They are both for sale at Essentials & Beyond on Victoria Street, downtown Kamloops.  They carry a wide selection of our scarf accent pieces as well as our interchangeable earrings collection.


Interchangeable Earring Beads are also reversible


Interchangeable Earring Beads are also Reversible
If you are interested in making your own texture sheets, Helen Breil has a tutorial on how to do this.  She has some really great tips and is a good way to get you started. 

Tuesday, January 14, 2014

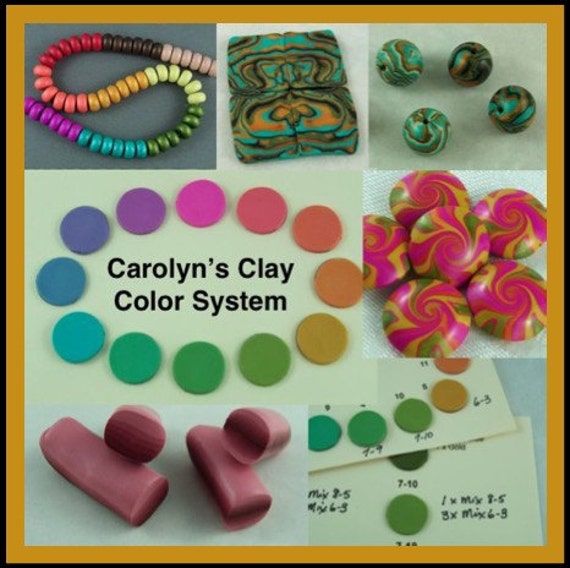
Carolyn's Clay Color System for Other Polymer Clay Brands

I thought I would give you an update on my Clay Color System.  Even though the color recipes included in my tutorial are based on Kato clay, the tutorial itself can be used with any other clay brand.  If you find mixing colors sometimes a little confusing or complicated, then you will find this color system very helpful. Included are several worksheets to help you learn about color mixing and combining and to assist you in exploring color and creating your own color recipes.

But this tutorial is more than just clay color recipes.  It is an entire system for organizing your recipes as well as the clay that you mix up.  And now included is a second set of recipe cards to use with any other polymer clay brand.  While they do not contain the kato clay color recipes, some of the base mix recipes are included that can be applied to other clays such as Premo or Fimo.  You can still use the color system tutorial to explore color mixing and the color recipe cards for saving your own recipes and baked clay color chip samples.


I have received a lot of positive feedback on this tutorial and would like to share some of those comments with you.  I have left the names anonymous and would like to thank those who took the time to share there appreciation with me.

* Love this color system!  Very easy to follow and very detailed.

* A great tutorial.  It unlocks the mystery of color mixing.

* This tutorial is fabulous!  So much detail and advice!  Now just need to ... start making my color samples!

* Terrific tutorial.  Very happy with this purchase.  Can highly recommend.  A+++

* This is a really great color tutorial with many wonderful worksheets and ideas.

* Quick delivery and a lot of fun!  My photo album is filling up nicely!

* Excellent tutorial!  Great way to learn about color and organize your clay stash.

You can also read a review by Wendy Orlowski here and Cynthia Blanton here.  Both of them suggest making an extra set of color chips so they can play with them on their work table to see how the colors go with one another.


Saturday, January 11, 2014

Summary for the Polymer Clay Recipes for the Pantone Spring 2014 Fashion Colors

So I hope you enjoyed mixing up some new colors for the new year.  Here is a summary of all ten of the Pantone Spring 2014 Fashion Colors.


Just click on each picture below to see the color recipe using Kato polyclay.  You can see my other clay recipes for Pantone colors from past seasons on the "Polymer Clay Color Recipes & Tips" page link at the top of this blog.

Just a note here.  I have been asked many times if I recreate these color recipes in other clay brands such as Premo.  We use to use Premo clay some time ago but have since then switched and use pretty much only the Kato brand now.  Some time ago, I wrote a blog post explaining why we switched and you can read it here.


Friday, January 10, 2014

Pantone Spring 2014 Fashion Color Paloma

Paloma is the last of the ten Pantone Spring 2014 colors which is pretty much a basic neutral grey.

I wanted to create some pieces using a "tone on tone" affect.  This is where the same color is used in different saturations.  To create this look, I made these scarf clips using the Sutton Slice technique in the color Paloma (see below) with Charcoal (Recipe #1-9 in my Clay Color System tutorial).


The Sutton Slice technique, by Lisa Pavelka, is fun to do.  One thing I discovered is that the Kato clay is a much drier clay than other brands like Premo.  I found that when the clay is too dry, it is difficult to keep it from coming out of the texture sheet when slicing.  If you find this the case, then mix in a little bit of transluscent or liquid clay to make it more "sticky".

Here are two more scarf clips I made with the tone on tone effect in the Sutton Slice.  For the light green I used the Pantone color Hemlock and for the dark green I used the base color that I used to mix up the Hemlock, Cilantro (recipe # 7-3).


For the blue, I used the Pantone colors Dazzling Blue and Placid Blue to create the same tone on tone look.


Anytime you want to create a darker shade of a color, just either omit or reduce the white (mix) in the clay recipe.  To create a lighter shade, you would then add or increase the amount of white (mix).  You have noticed by now, that most of the time, instead of adding straight white to my color recipes, I use a white mix.  I always have a large amount of this mixed up in advance and handy all the time.  I find it adds more depth to my colors where adding straight white tends to leave them more "flat".   

Here is the clay color recipe for Paloma


* The White Mix # 1-2 is a base mix clay recipe found in my Color System tutorial which is available in our Etsy shop (as an instant download) or in our online store (which will be e-mailed within 24 hours).

Thursday, January 9, 2014

Pantone Spring 2014 Fashion Color Celosia Orange

The Pantone Spring 2014 color Celosia Orange is described as an optimistic and spontaneous hue.  It is another one of this springs bolder colors.  While this color is rather strong, it still has a nice softness about it with a peachy coral tinge and as Leatrice Eiseman says, one could wear this type of orange without looking like a popsicle.


Pantone suggests to pair Celosia Orange with Violet Tulip for a "captivating vision, much like the setting sun. I do love these colors together but wondering what technique would allow each color to show off best.  There are certain rules in color mixing that we need to keep in mind when working with mediums like paint or polymer clay.  The Celosia Orange and Violet Tulip are both secondary colors on the color wheel.  If these two (secondary) shades were to actually mix you would end up with mud or brown and that wouldn't be too pretty at all.  If white or black, for instance were used as a sort of "separation" and contrast for the two colors, the orange and violet colors would then pop.

I have been playing with Bargello patterns lately and so decided to try a combination of Freesia and Cayenne with the Celosia Orange.  This color combination works quite well together in a harmonious way.


Here is the clay color recipe


* The White Mix # 1-2 is a base mix clay recipe found in my Color System tutorial which is available in our Etsy shop (as an instant download) or in our online store (which will be e-mailed within 24 hours).