We cover the double-ended seam rippers to sell but have had requests for single ones that can be worn around the neck so they are handy while sewing. We created our own design by adding a swivel clip at the end and include a 30" stainless steel necklace chain. The clip can also be used to attach to your bag.
Showing posts with label sewing. Show all posts
Tuesday, March 22, 2016
Seam Rippers
Monday, December 21, 2015
Interchangeable Snaps for Sewing and Knitting
When I first discovered the original (made in China) "Snap" jewelry on the internet I let out a squeal and was so excited about the concept. I immediately started researching out suppliers to see how we could incorporate this inventive idea with our clay. My original idea was not only to use it for jewelry but in some way add it to items that were sewn, knit, crocheted or felted and accessories like leather shoes or belts.
After a lot of experimentation and testing we came up with several methods to add interchangeable snap bases to your finished items. The first method is a snap base that you actually sew on which we have invented and made ourselves. This is the simplest way to create an interchangeable button for items such as a jacket or handbag like the one shown below.
These sew on snap bases are now available in our online shop (click here or on the above photo).
The other method is attaching the snap base to your item using a crimping tool. It is simple to attach this way to an item that is knit or crocheted, however you will need to use a sewing awl to make your hole in a fabric garment such as a jacket. If you do this I recommend sealing the hole with fabric glue or "Fray Check" before attaching the snap base. If you are attaching your snap base to a material such as leather, then you will need to punch a hole before crimping. The snap bases and tools shown above are available in our online shop (click here or on the above photo).
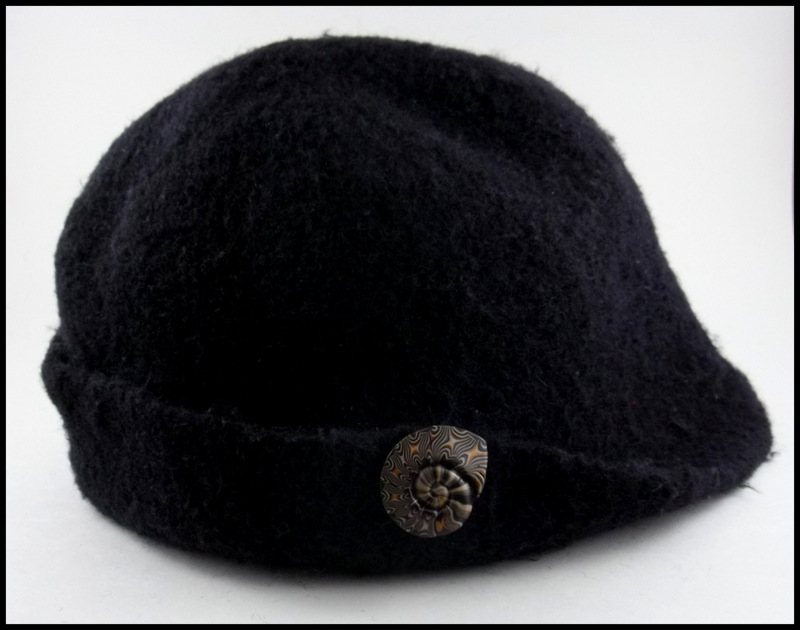
Here I have attached a snap base to a felted hat. When the brim was turned up it was too thick for the snap to go through both layers so I attached it to the outside brim only. I had to put a hole through the felted brim with an awl in order for the bottom part of the snap base to fit through. Now I can attach different Art Bead "Snaps" for a fun new look or to coordinate with what I am wearing!
After a lot of experimentation and testing we came up with several methods to add interchangeable snap bases to your finished items. The first method is a snap base that you actually sew on which we have invented and made ourselves. This is the simplest way to create an interchangeable button for items such as a jacket or handbag like the one shown below.
| Handbag with Sew on Snap Base |
| Handbag with Snap Base and Flower "Snap" that is Interchangeable |
![]() |
| Sew on Snap Base to Create an Interchangeable Button |
The other method is attaching the snap base to your item using a crimping tool. It is simple to attach this way to an item that is knit or crocheted, however you will need to use a sewing awl to make your hole in a fabric garment such as a jacket. If you do this I recommend sealing the hole with fabric glue or "Fray Check" before attaching the snap base. If you are attaching your snap base to a material such as leather, then you will need to punch a hole before crimping. The snap bases and tools shown above are available in our online shop (click here or on the above photo).
Here I have attached a snap base to a felted hat. When the brim was turned up it was too thick for the snap to go through both layers so I attached it to the outside brim only. I had to put a hole through the felted brim with an awl in order for the bottom part of the snap base to fit through. Now I can attach different Art Bead "Snaps" for a fun new look or to coordinate with what I am wearing!
Saturday, November 8, 2014
Brilliant Bloom Buttons Used
Our Brilliant Blooms buttons have really become a popular item and people are finding more uses for them which we love to see. This hat was knit by Carla and she added a grouping of several Blooms buttons as an accent. Carla works at Katja's Quilt Shoppe and is so talented. She not only does some fabulous quilting, she is an avid knitter. If you are into either of these, you might want to check out and follow her blog, Grace and Favour.
This baby snuggy vest was knit by Anne at Kelowna Yarn & Needlecrafts. I love the color and how she used the Blooms buttons on it. Anne's store specializes in yarn and patterns for children and babies and we have been working with her in creating some buttons for these items just for her shop.
Monday, June 16, 2014
Yarn Ball Buttons
One of the things we love about selling our buttons and shawl pins wholesale is working directly with the shop owners and managers. We get feedback as to what their needs are so we can customize their orders.
Anne from Kelowna Yarn and Needlecrafts in Kelowna, BC requested some buttons that looked like a ball of yarn to go with a sweater she was knitting. Here she is wearing it, all finished and with the buttons on.
These buttons have a metal shank and so we made some plain buttons for the inside as "backing supports" as you can see here:
We make our own metal shanks with wire. We have seen how some people use jump rings but I don't see how that could be strong enough for a button with normal wear and tear. When we make our buttons, we want them to be practical and functional besides just nice looking. A button for sewing should be made more durable than a jewelry item such as a brooch or earring.
In my tutorial, "Making Beautiful Buttons" I show how you can make your own button shanks and then actually embed them into the clay so no glue is needed. Glue (no matter what type) tends to dry out and deteriorate after time and if it is intended to go through the wash, glue will not hold up over time.
More of these yarn ball buttons (in other colors) will be available at Kelowna Yarn & Needlecrafts very soon.
Anne from Kelowna Yarn and Needlecrafts in Kelowna, BC requested some buttons that looked like a ball of yarn to go with a sweater she was knitting. Here she is wearing it, all finished and with the buttons on.
These buttons have a metal shank and so we made some plain buttons for the inside as "backing supports" as you can see here:
We make our own metal shanks with wire. We have seen how some people use jump rings but I don't see how that could be strong enough for a button with normal wear and tear. When we make our buttons, we want them to be practical and functional besides just nice looking. A button for sewing should be made more durable than a jewelry item such as a brooch or earring.
In my tutorial, "Making Beautiful Buttons" I show how you can make your own button shanks and then actually embed them into the clay so no glue is needed. Glue (no matter what type) tends to dry out and deteriorate after time and if it is intended to go through the wash, glue will not hold up over time.
More of these yarn ball buttons (in other colors) will be available at Kelowna Yarn & Needlecrafts very soon.
Monday, April 21, 2014
Fancy Tools for Sewing
We are always looking for unique items to create or cover with the polymer clay. Since sewing was my first love and something I still enjoy doing when I have a little extra time, I couldn't pass up these seam rippers. Even though I don't like ripping out any stitches and generally cringe when I have to, I think using one of these will make it more tolerable and perhaps even enjoyable!
These are quite unique as each end pulls out to reveal a small and large seam ripper that are super sharp.
These were a big hit at the quilt show and since we made extra, we now have some listed in our online store.
These are quite unique as each end pulls out to reveal a small and large seam ripper that are super sharp.
The seam rippers tuck away and are stored inside the case when not in use.
These were a big hit at the quilt show and since we made extra, we now have some listed in our online store.
Tuesday, July 30, 2013
New Sewing Area
I really love the studio that Dave and I created in our home. There are three large working tables plus a corner unit for baking. No matter how much space one might have, however, there just never seems to be enough which is a good reason to keeping it tidy and organized.
The only thing missing in our studio was a sewing area. My sewing machine and serger were basically stored away, under one of the work tables and then pulled out as needed. I really wanted to use them more so I came up with a plan. First I had both machines serviced as it had been a while. Bill at Heather's Fabric Shelf did an awesome job of cleaning and tuning them up and now they just hum and purr.
Next was to create my own sewing area space and so started my search using Pinterest. If you aren't hooked on Pinterest yet, you do not know what you are missing! It is such a great way to get all sorts of fun ideas. If you are looking for some cool ideas to fine tune your studio, you can check out some of my Pinterest boards and follow them if you wish. I have a board on "Studios" and another on "Getting Organized". Some of the ideas may not be for a polymer clay type studio but many of the ideas could still be applied.
And so this is where my new sewing area is ... Taa daa!
The only thing missing in our studio was a sewing area. My sewing machine and serger were basically stored away, under one of the work tables and then pulled out as needed. I really wanted to use them more so I came up with a plan. First I had both machines serviced as it had been a while. Bill at Heather's Fabric Shelf did an awesome job of cleaning and tuning them up and now they just hum and purr.
Next was to create my own sewing area space and so started my search using Pinterest. If you aren't hooked on Pinterest yet, you do not know what you are missing! It is such a great way to get all sorts of fun ideas. If you are looking for some cool ideas to fine tune your studio, you can check out some of my Pinterest boards and follow them if you wish. I have a board on "Studios" and another on "Getting Organized". Some of the ideas may not be for a polymer clay type studio but many of the ideas could still be applied.
And so this is where my new sewing area is ... Taa daa!
That's right ... believe it or not, it is hidden away in the closet. And since it is the closet in the studio, it is even handier. I never thought about it before until I came across a few on Pinterest so started searching closet studios or closet sewing areas further and found so many cool ideas. So I thought, why not make more use of the space we already have and I love how it turned out and everything just seemed to fit!
Here is my sewing area that fits nicely on the one side. The desk we had fit perfectly in that space. We happened to have a piece of pegboard that Dave hung on the wall for me. My large thread spools for the serger fit on a shelf at the top. The other important factor with having an area like this is proper lighting. I managed to easily hook up two Ott lights so the area is nice and bright. The one Ott light clips onto the corner shelving so it is out of the way. I've had this light for several years but never liked the way it clipped and always felt it was so awkward but it has finally found a suitable spot.
The other Ott light hangs right on the pegboard!
The drawer in the desk holds all of my thread so I can easily see all the colors.
Besides all the work area, I still have the shelves on the side and above for storage.
So that was just half of the closet and this is what I did with the other side:
Our photo light box fits inside on some shelving. I love how it is out of the way and frees up more counter space. And because I have a power bar in the closet for the lights and sewing machines already, the light box can plug in as well. Above are fabrics for sewing hung on skirt/pant hangers -- another idea I picked up on Pinterest. The hanging closet shoe shelf just fits down the one side for storing other items such as more fabric and odds and ends.
So now I not only feel the studio is more organized I have a lot more counter space freed up and I can sew when I want without the hassle of pulling my machines out and setting them up every time.
Wednesday, July 28, 2010
Mokume Gane Buttons
I created some buttons from the mokume gane sheets I made the other day. I love the look of them and think I will make some more.... In the meantime, these are available in our Art Fire Studio and Etsy Shop.
Thursday, June 24, 2010
Some New Buttons
I was commissioned to make some buttons for some sofa cushions last week. I had some fun making them and experimenting with mica powders and inks and love how they turned out with a sort of antique-patina finish. I got carried away and made a few and so the extra ones are now for sale in our ArtFire Studio.
Wednesday, November 25, 2009
Here are a few of the buttons listed in our Etsy Shop. I've been experimenting with a variety of designs, shapes and sizes....


Purple Pansies Autumn Leaves
Subscribe to:
Posts (Atom)