Monday, January 31, 2011

One World One Heart

Welcome to our blog!  We are happy to be participating for the third time in this year's fifth and final One World One Heart event.  This is where other bloggers around the world get to meet one another and share.

My claymate hubby and I create original beads, buttons, jewelry and home decor art all from polymer clay.   We have several gifts for our give-a-way this year.

A Lace Heart Pendant
This heart is in berry pink and is handcrafted from polymer clay using vintage lace as a texture and then highlighted with chalks and mica powders.  There is a Swarovski crystal embedded into the center and is hanging from a pretty silver plated bail.  It is on a nylon coated steel cable with our "signature" barrel type clasp.

Lace Heart Buttons
A set of three large handcrafted polymer clay buttons in pink, blue and maroon.  These were textured as well with the same vintage lace.  

Funky Swirly Beads
A set of four double-sided textured beads in purple orchid and gold along with five large rondelle spacers all handmade by us.

For a chance to win one of these gifts:

* You must be a blogger yourself and have an active blog to participate.

* Leave a comment on this blog post with some way for us to contact you if you win.  If we cannot contact you, we will have to draw another name.

* Since we have three gifts for three different people, you tell us which of the three gifts you would appreciate the most....

That's all you have to do!

We will do a random draw for each of the three gifts from the list of comments on February 17th which is also when the winner will be announced.

Click on the photo below to find all the other participants and more about the One World One Heart Event...


Have fun and we are looking forward to meeting all of you!

Saturday, January 29, 2011

Announcing the Winner of our Lace Heart Pendant Give-a-Way

It was really great getting to meet some of our followers who left comments on our give away blog post the last few days.  It was very encouraging hearing the wonderful feedback and we are glad you've enjoyed our blog so far.

We made a draw this morning from all the names and are happy to announce the winner of our Lace Heart Pendant is .....


Bonnie from B-LEE KREATIONS....   Congratulations Bonnie!  We have e-mailed you and just need you to send us your mailing address.

The One World One Heart begins tomorrow.  It is an event for bloggers to meet one another from around the globe and we have several items we will be giving away this year.

P.S.  Thanks Bonnie for getting back so quick and so glad we made your day!

Friday, January 28, 2011

Blog Debris Friday

We've enjoyed reading all the comments coming in for our give away contest.  Keep them coming as the cut-off is this evening and you still have time.

I thought I would share something each week that I find amazing or inspiring through my web surfing and exploring.

When I saw how this house was redecorated my heart skipped a beat and it was love at first sight!  It reminded me of some of the homes we had while living in Mexico with all the rich colors and tile work.

Click on the photos to read the article and see more eye popping photos.


We will be adding more color with some polymer clay tiles to our walls in the spring and seeing these photos really makes me want to get right at it!

Wednesday, January 26, 2011

Time for a Give away!

Earlier this week the list of followers on this blog passed 400!  I mentioned on our facebook page we would have a give-a-way to celebrate but was so busy finishing up my color tutorial, I didn't have time to get around to it.

The One World One Heart Event will be starting January 30th this year.  It is the fifth and final year for this and we will be participating again for our third time.  But as a special thanks to all our regular followers, we are having a "Pre-Valentine Heart Give-a-Way".


We will be giving away this handcrafted heart pendant.  The texture was made from antique lace and then highlighted with mica powder pigments in a deep teal and lavender.  There is a teal Swarovski crystal embedded into the center and it is hung from a silver plated bail on a nylon coated steel cable with our "signature" barrel type clasp.

To win this pendant, all you have to do is leave a comment here on this post and just a little mention as to what country you are from and how you met us or found our blog (if you can remember).  You have gotten to know us and our work through this blog, this is a great way for us to get to know more about you, our followers.

The cut-off for this give-a-away will be 9:00 pm Pacific time on Friday, January 28.  We will make the draw on Saturday from the list of comments placed here and announce the winner that day.  Remember to make sure there is a way to contact you if you win or we will have to draw another name.

Good luck and we are looking forward to hearing from you!

Carolyn and Dave Good

Monday, January 24, 2011

My New Color Tutorial is Available

I am happy to announce that my Color Tutorial, "Carolyn's Clay Color System" is now available!  It is for sale in our ArtFire Studio as well as our Etsy Shop.


In this tutorial you will learn:
* how to mix clay color recipes and organize them with your own "color library system"
* how to mix up new colors by making your own "Custom Color Wheel Charts"
* how to make a Six-Step Color Blend
* a fun technique for testing color combinations I call my "Mini-Mokume"
* how to make some beads from your "mokume"

Through this lesson you will:
* have more confidence in mixing and combining colors
* have a more organized clay area
* have more time and clay to get right into your projects

Included with this lesson are:
* cards to print out with more than 50 of my favorite color recipes using Kato polyclay to get you started.
   (Note: some of these recipes can be adapted to other clay brands and separate cards are provided.)
* some of the recipes are my own "base mixes" used to create various tints, shades or hues.
* printable worksheets for mixing clay blends and your own "custom color wheels"
* printable cards to record and save your own color blends and mixes.
* 23 pages of instruction and photos
* 38 pages of printable worksheets, charts and recipe cards

Sunday, January 23, 2011

Testing Color Combinations

Do you find it hard to choose the right colors to go together for a project?  --- or find yourself using the same colors all the time?

Have you ever gone through a lot of work of making a cane or other technique to discover the color combination you used was too dark or not exactly right?

In my new color tutorial, (available very soon),  I will share with you a fun way to create color combinations without wasting a lot of time or clay.  I call this technique my color-testing "mini-mokume".


I will then demonstrate how to make some beads with your new "mokume".


And most of all, this tutorial will help you step out of your "comfort zone" and discover new colors and combinations.


Thursday, January 20, 2011

Creating Your Own Custom Color Wheels

Do you find color theory complicated?  Do you have a difficult time finding the right color combinations?   I love mixing up new colors and below is a sample of one of my own rainbow-type blends.  I like to call them my own "Custom Color Wheels".  They are fun to make and and open up so many possibilities for mixing and combining colors.


Here are some pieces I made with the colors from the above chart:


In my color tutorial I will show you how to create your own Custom Color Wheels where you will find mixing up new colors and creating color blends not only fun but inspiring.

I will also teach you how to create a step blend -- like this:


And turn it into canes like so:


Then record it for later reference

These color charts take very little clay and are so quick and easy to make, you will have more time to get right into your projects.

All this (and more) will be available very soon!

Wednesday, January 19, 2011

My Clay Color System

One thing I enjoy the most about working with polymer clay is not only how I can create new colors but I can actually save those recipes and make them again whenever I want.  While I enjoy mixing up new colors, I don't like wasting a lot of clay in the process.  I also find that some of the "color mixing exercises"  out there are time consuming and I would rather get right into the projects I want to make.

I have developed my own color system library where I can quickly pick and choose my clay colors and recipes for easy combining.  It is a simple system that allows for expanding to more color options and at the same time keeps everything organized.  I also developed my own color base "recipes" for mixing up new colors, shades, hues or blends.


My new tutorial on color combining will be available shortly and I plan to share all this with you plus more.   Although my recipes are for Kato polyclay,  I understand that many prefer other brands and so my system can be easily adapted to them.

Tuesday, January 18, 2011

Why I Use Kato Clay?


I wasn't always a Kato fan.  I started out using Fimo and then switched to Premo when I fell in love with the rich colors.  When the phthalates had to be removed from all plastics, the consistency of the polymer clay changed making the Premo clay much softer and mushy.  I found it just didn't work as well for me when I wanted more detail especially when making canes.

I decided to give Kato clay a try.  I found it extremely frustrating and difficult to work with at first and almost wanted to curse every time it would crumble when slicing or conditioning it.  I found a way to relieve my frustration thanks to Jana Roberts Benzon and her "Jana Whack" method by pounding the ----  out of it with a rubber mallet first!  At least it made it more bearable to work with.

Fortunately Donna Kato announced they were changing their formula again to make it a little softer and easier to condition.  It was a year later when I finally got my hands on some and I was finally satisfied that it was a more superior product than the other clay brands I've tried.  Below is an example of two leaf canes I had made.  The one on the left made with Kato clay which shows more detail and clarity than the one on the right made from Premo.


But what about the colors?  Premo has some beautiful ones but other than a few like black or gold, I'm not one to use any of the clay colors straight from the package.  And now that Polyform has revamped their colors many recipes that we have created will have to be reformulated all over again.  Many artists were up in arms when they tried to discontinue several of their primary colors like cobalt blue and zinc yellow.  Polyform compromised by making them still available but only from a few sources that sell online.  It is apparent that they still don't consider the artist community who buy tons of clay from them each year that important.

So what about Kato clay?  Well Kato clay was formulated by Donna Kato, an artist, for other artists.  She understands the artists needs and demands for a top quality product.  I discovered I could create gorgeous rich colors and finer detail with Kato clay like in these bracelets.


Shades of Clay is a Canadian supplier that I buy my clay from and they have some great color recipes  for Kato clay.  These recipes are great as they are similar to some of the most popular colors from other clay brands.  You will find the color recipes on the link here.

I have many more rich color recipes that I have formulated, all from Kato clay which I decided to share in my new tutorial that will be available soon.  I will share my own method of mixing, blending and combining colors as well as a simple and unique way of organizing your clay and recipes.  This is a fun way to discover new colors and exciting color combinations.

I will share more about this with you next time.

Update:
My tutorial is now available and you can read about it here.

Saturday, January 15, 2011

Creating a Landscape Pendant

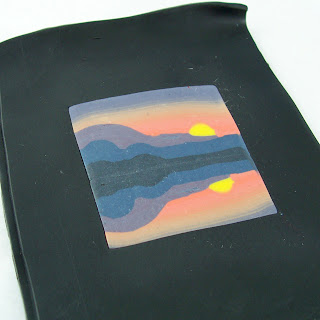
Some time ago I did an exchange with Sandy, a fellow Canadian polymer clay artist.  I sent her a pair of earrings and she had sent me some beautiful landscape canes she had created.  I said I would finish some of them off into some jewelry pieces and share how I did it.  They were all so nice, I needed time to choose the best design .  This is what I created from one of her canes:


I took 2 slices from the cane and placed them on a thin sheet of clay,
lining them up to create a mirror image.


Place a sheet of tracing paper and burnish
with a thick piece of card stock.

You can see how the two pieces are now joined and fairly smooth.

I then cut out my shape.  A shaped cutter would've worked good for this,
however I didn't have one in the size I wanted so I just used my blade.

I rolled some clay out to the same thickness as the cane piece ...

and cut out around the piece creating a "frame".

I then removed the center piece and replaced it with the cane slice.

I burnished the entire piece smooth again to blend the seams.

I then made a textured sheet of clay for the backing ...

and placed the textured sheet below the cane sheet with wrong sides together.

I cut around it leaving a "frame".

I wanted a curve to the pendant so I baked it over
a piece of cut paper towel roll.

To attach a cord I made a couple of "tubes" from clay and attached them
to the back using liquid clay as a bonding agent and then baked again.

I sanded the entire piece and then gave it a nice satin glaze finish. 
I hung it from a velvet rubber cord and Voila!  I now have a
gorgeous pendant and keepsake memento of Sandy's beautiful cane work!

Wednesday, January 12, 2011

Announcing the Winner of our Naming Contest

We had a lot of great name suggestions come in.  A big thank-you to those who contributed.  We narrowed it down to three that we especially liked and want to give an honorable mention to Cynthia Blanton -- she gave a lot of good suggestions and we especially liked the one "Western Glitz" and an honorable mention to Kim Sturgis for the name "Country Class".

The name we chose as the winner is "Country Charm" from Dana and will be the official name for our  "Country Charm Collection".   Thank you Dana and we will e-mail you the $25 gift certificate.

And here are some of the new Bargello pieces finally finished:


Monday, January 10, 2011

Contest Continued

There are some good name suggestions coming in for a our contest but we are still looking for more.  This will be a permanent name for our new country western jewelry line so we want it to be special.

I finished off some bargello style beads and working on some designs with them.  Will have the finished pieces for you to see later.


Here is another finished boot bracelet which can also be doubled up and worn on the wrist.


And of course more feather styles in shades of blue:


Leave your name suggestions on our original blog post here for a chance to win a $25 gift certificate to be used towards anything in our ArtFire Studio or custom order.