Friday, February 27, 2009

Custom Designs

I love the challenge of creating custom designs for people as it forces me to stretch my creativity and try new things.  One of our latest requests was for a cross pendant (in brown or beige tones) on a brown suede cord with some sort of matching earrings.  I thought of the cross pendant we had made for a friend last year in a mokume gane but decided to try a few other techniques and then let her choose which pendant she liked the best.

This is the pendant she chose and so I made earrings to match.  Because she likes her earrings to dangle a fair bit, we added the sand opal Swarovski crystals which added a nice finishing touch.


The filigree cross pendants shown in the photo below were created by arranging tiny strands of clay to form a pattern.  These were a lot of fun to create as well as the mica shift ones shown in the bottom photo.  A mica shift is a technique where you create a ghost image in the clay.  The crosses appear textured but in fact they were sanded to a silky smooth finish and then buffed to create a satin sheen.


We decided to finish the crosses with some rich velvet ribbons to create an elegant look.

Tuesday, February 24, 2009

Signature Stamp Tutorial

A few weeks ago I said I would share how I made a signature stamp so I'm finally getting around to it.  You can use this method to create other types of stamps as well.  

Start with drawing out your design on some tracing paper.  If you are doing anything with lettering such as our logo as  shown below, you don't have to worry about reversing them because the stamp will create the same image as you are drawing.

1.    2. 

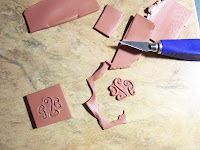
(1) On a thick sheet of clay pressed onto a tile so it doesn't slip, place your drawing over the clay and lightly trace over the image with a pointed tool to create a light impression. 
(2) Pull the paper away and with your tool, go over the impression several times to make a deeper impression.  Try to use the same pressure so all of the impressions are of the same depth. 

3.    4. 

(3) Trim the excess clay away, leaving the carved piece on the tile to bake.  Bake following your clay package instructions.  After your piece is cooled, sand it with wet/dry sandpaper until it is smooth and level.  You have now created your "mould" to make your stamp.
(4) Now take a medium-thick sheet of clay and press the clay into your mould to create a reversed image.

5.    6. 

(5) Press this piece of clay onto a ceramic tile and carefully cut around the letters.  Do not remove it from the tile or it will distort and bake this piece.
(6) Shape a piece of clay and attach it to the back of your stamp to make a handle.  Bake this piece again.

7. 

(7) You may need to lightly sand your stamp to make a smooth impression (which naturally I have not done yet here!)  Anyhow, Voila!  Your stamp is now ready to use!

Sunday, February 22, 2009

"Claying Around"

Since we have moved and been in "retirement mode" I (Carolyn) seem to lose myself in the studio for hours at a time.  I find myself getting into more of a regular routine each day, photographing our work (this is at certain times of the day when the lighting is best), organizing, sewing (I started to make some of our little "gift bags" for the jewelry - I will blog on that another time) and then more time for just "claying around".  While the other things are essential, I enjoy the claying part the most.  

Because I now have more time in the studio, I am finding more time for creating and learning new techniques.  My work is piling up and while I didn't seem to have enough to blog about earlier, I'm finding I have a lot more now so will try and post more often.

One of the things on my "to do" list was to sculpt a face.  I sculpted my first face and then made a mould from that face.  I then made some faces from that mould which are shown below.


I want to create some angels so I made some faux cloisonne wings.  This basic technique came from one of Donna Kato's books.  I started with drawing my wing pattern and then carefully cutting that pattern into a thin sheet of clay to make a stencil.


With that stencil I created a mould from clay and can now make more wings of the same design from that mould like the ones shown below.


I applied green mica powders and antique gold paint and then a layer of liquid Kato to give them a glassy finish.  I drew the wing pattern to be used as either angel or butterfly wings.  Now I have to think about how to pull this all together.

Friday, February 20, 2009

New "Puff Pendants"


As artists we are always looking for other ways to promote our work to the public.  We've been on Etsy for six weeks now and have finally made our first sales through them.  We're use to dealing one on one with friends and clients who know us and our work but using the internet is a whole new arena.

It's been a long haul for the past month and a half as there is so much work involved.  You think of the time spent creating your art, but there are countless hours added with photographing, editing the photographs and then documenting every little detail.  When things weren't moving at first, I started thinking that maybe it was the price.  But we had no problem selling at those same prices before so why should we sell for less because it is on Etsy?   I've been experimenting with our Etsy shop to see how it could be improved.  I would post different items in different ways to see what sort of interest it would get.  For instance we started with posting some of our jewelry pieces as sets but then decided that people would prefer the option of buying only the earrings or pendant separately, so we decided to split the sets up and will now go more with a "mix and match" theme instead.

Another thing about selling from this type of venue is getting known as there are so many other  sellers and thousands of items being listed every day.  You have to find some way to be noticed and stand out.  That is why I'm so excited about our first Etsy sale.  One of the items sold was one of our new "Puff Pendants" shown above.  The pendant is textured and hollow with either cane slices applied such as the leaves and pansies in the centre, or a faux cloisonne dragonfly on the other two pendants, creating a 3-d effect.  It is then finished with a clay bail in which a rubber cord fits through nicely so the pendant is balanced and stays in place.  This was a lot fun to design and make and spurs me on to create more along this line.

Thursday, February 12, 2009

Announcing the Winners for the OWOH Give-a-Way!

Well we picked the winners by using Random Integer Generator.  We didn't do anything fancy -- just let it pick the numbers.  So here they are:

First place is Lisa of Mud Hound Primitives from Maryland, U.S.  When Lisa commented, she chose the heart in the centre because she likes things that are symmetrical so we have sent that off to her.  Second place winner is Brenda of The Crafty Chook and is from South Australia.  She chose her pendant and we have sent hers off as well.  Congrats to you both.

Thanks again to Lisa Swifka and any others that helped organize this event.  It was very well run and a fun way to meet other fellow bloggers and artists making our world feel a little smaller!

Wednesday, February 11, 2009

One World One Heart Give Away is Coming to an End


The One World One Heart give-away comes to an end tonight at 10:00 pm Pacific time.  We will use the Random Number Generator to pick the number of the winners of two of these heart pendants.  Yes, we said if there were more than 100 comments we would give two away and looks like we more than doubled that number.

We will do the draw tomorrow (Feb 12) morning and will contact the 1st and 2nd winners right away.  If the winners do not respond by that evening, then we will do another draw the next day on Feb 13.

This has been a lot of fun and even a little overwhelming as some of you may feel as well, with so many participants -- Wow over 900?!!  We tried to visit as many of you as possible and was really neat to see so many interesting blogs and "meet" the people behind them.  We plan to drop by and visit you later when we have more time.

Thank-you to everyone who participated and took the time out to leave such nice comments. Good luck to all of you in the draw tomorrow!!

Friday, February 6, 2009

It's a Brooch and Pendant All in One!


I'm so excited about our new design.  I really like both brooches and pendants but sometimes wish they could be worn either way.  It would just make them more versatile.  I bought a pendant converter that slides onto a brooch pin which is okay but doesn't work on a lot of brooches since it depends on where the brooch pin is positioned, or it does not hang right.  And then, how can you make a pendant into a brooch?  Well you can, but it isn't that easy.  So, after a lot of brain stretching, I finally came up with a design to make a brooch and a pendant all in one! And yes, it coverts back and forth very quickly and easily.  Want to change it from a brooch to a pendant?  Just slide your cord or chain into the holders in the back and Voila!  Instant necklace!  The holder even "locks" the cord into place so the pendant will not fall off.  We have three designs we have made so far, one of which is shown here, which is for sale on Etsy.  
The technique used for this brooch-pendant is a faux cloisonne where I started with my own original drawing and sculpted a mould.  From that mould I make the design form by etching and using pure mica powder pigments for color and then antiquing and glazing with a polymer-resin type glaze.  The piece is fired between each application so by the time it is completed, it has been fired at least 4 times.  Then for a smooth and crystal clear, glassy finish a heat gun was used at the end.  As a matter of fact, the pieces are so glassy and shiny, it is very difficult to take good photos due to the reflection.  So if you see any "haziness", it is from the camera and not in the piece.

We also have optional cords in various colors for sale as well in case you don't have one of your own.  They are a "Softglass" rubber cord which have a silky feel to them and drape really nicely.  We have made them stronger by running 49 strand flexible wire through them and double securing at each end.  I have more drawings and ideas in my head yet so look for more designs coming soon!