Friday, July 8, 2011

Embossed Clay Earring Tutorial Featured

I just discovered a new site today called All Free Beaded Jewelry.  It is a site that lists all sorts of links to free tutorials for jewelry making on the internet and they featured our Embossed Clay Earring Tutorial there.


Of course you can make these earrings in other colors or shapes and are great for coordinating with your favorite outfit.


We have more free tutorials available on our blog for you to enjoy and you will find them all listed at the top of this page.

Thursday, July 7, 2011

Surprise

A package arrived today that we had ordered from the U.S. a week ago Monday.  We ordered the day they ended the postal strike and were worried things would be backed up at Canada customs due to a mail backlog but we received it in good time.  We have some classes scheduled and were in desperate need of some tools such as acrylic rollers, shaped cutters and tissue blades for our students to use.


We were also low on some findings that were needed to finish off some pieces for the Shuswap Lake Festival of the Arts show.  Now we aren't so pressured for time in adding the final touches and we can be ready for set-up on Monday.  Here are a couple more bargello style necklaces in black and white for a different look.


All the little black rondelle spacer beads are made from clay as well as the cubes.  We make these in matching colors by the hundreds now and I share my little secret on how to make both in our Making Rondelle Spacer Beads tutorial which has become quite popular.

Saturday, July 2, 2011

Balancing act with Buttons, Bargello and Beach Bling

Things are extra busy for us this time of year with the Shuswap Festival of the Arts just around the corner.  It is an 8 day show where we have our work for sale in the gift shop there.   It seems there is always so much to do before then with finishing and tagging everything and fine tuning our display.  This year has become more of a balancing act with button orders to fill, custom orders to finish and preparing for several classes to teach.

We finished off some more bargello style jewelry this time with some slight design variations.  The earrings were quite popular and we sold out so we are making more.


I love creating bargello style patterns in the clay.  After the various blends are created, they are stacked, sliced, and then arranged like a quilt pattern on a clay background.  I'm currently working on some more color schemes and will have some to show you this week.


Wednesday, June 29, 2011

New Stacking Type Buttons

I've had requests in the past to make some plain buttons in solid colors and never gave it much thought at the time.  I later came to realize there are not that many types of buttons easily available today that there were years ago.  I started out making a few smaller type buttons in various shapes and colors which then evolved into several more sizes so they can actually be stacked or layered for a fun look.


I used this layered method for decorating several pair of flip flops in some bright and cheery colors and are fun to wear at the beach or around town.  (I shared a tutorial on this in my previous post.)


Because these buttons are made from Kato polyclay, they are very durable and can be thrown into the washer and dryer.  This makes them very functional and can be used in all types of sewing projects and are especially great for children's clothes and accessories.

These buttons are now listed in our Etsy Shop and ArtFire Studio and will be available at Heather's Fabric Shelf soon.

Tuesday, June 28, 2011

Tutorial - Decorating Flip Flops

Flip flops are my shoe of choice during the warm summer months and I have several colors to coordinate with my clothes.


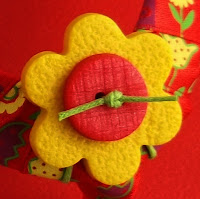
I decided to spice them up a bit by decorating them so I rummaged through my ribbon and trimmings bin to see what I could find and then added some of my handcrafted buttons as an accent.  (Some of the new buttons shown are now listed in our Etsy shop and ArtFire Studio).


This is how I did it so you can dress up your own
flip flops to wear this summer!

Step 1 - Cut two 36" (91 cm) long pieces of 3/4" to 1" wide ribbon.  If your ribbon is narrower, you will need it to be longer to allow for wrapping more times.  Here I am using a 1" wide organza which really gives a dressy look.


Step 2 - Wrap the ribbon around the strap stem of the flip flop starting from front to back and bringing it back to the front.


Step 3 - Bring the ribbon up and over the front of the straps, crossing the ribbon so they go in opposite directions.


Step 4 - Going in opposite directions, loop the ribbon around each of the straps once as shown.


Step 5 - While keeping the ribbon taught, wrap each of the straps with the ribbon overlapping it as you go.


Step 6 - When you get to the end, loop the ribbon around to tie a loose knot but do not tighten it just yet.


Step 7 - Add some glue inside the knot and then pull it tight.  I like to use just a regular fabric type tacky glue that dries clear.


Step 8 - Trim the ribbon ends when the glue is totally dry.


Variation:  Here I used a heavier type grosgrain ribbon for these flip flops so rather than tying at the end I instead applied lots of tacky glue and wrapped them around several times to hold.  I used binder clips to hold it until the glue was completely dry.  If your ribbon wants to fray out at the end, you can apply fray stop or the glue itself can prevent the ribbon from unravelling.  Allow to dry and then trim the ends.


Adding Button Decorations

Method 1 - Button with Shank

Step 9 - Cut two pieces of 1 mm thick cotton cord or similar each about 8" (20 cm) long.  Fold one of the cords in half and place it under the flip flop strap as shown.


Step 10 - Bring the two ends of the cord up through the loop.


Step 11 - Tie your button on and repeat for the other flip flop.


.
Method 2 - Button with 2 Holes

Step 12 - Cut two pieces of cotton cord or string and bring it up the same way as in steps 9 and 10 above.


Step 13 - Bring the cord up through each of the holes.


Step 14 - Tie a square knot and trim.


Method 3 - Buttons with 4 holes


Step 15  -  Cut two 8" (20 cm) pieces of cotton cord or string and  thread them downwards through two opposite holes (crosswise) of the button as shown.


Step 16  -  Place the button over the centre of the flip flop with one string on the right side "behind" the strap and the other on the left side "in front" of the strap.


Step 17  -  Bring the strings around the strap and upwards towards the button.  Thread the cord up through the other opposite two holes.


Step 18  -  Tie a square knot and trim.


Have a flip flop summer time!

Monday, June 27, 2011

Postal Strike is Over

Yeaaah!  The Canadian government is now making the postal workers return to work and I along with many other Canadians are very happy.  They will be back to work today in order to get the mail back to normal by Tuesday so we have reactivated the mailable items in our Etsy Shop and Artfire Studio once again.

In celebration of summer and this great news ... stay tuned for a free tutorial on some fun ways to decorate your flip flops that I will share with you tomorrow.

Thursday, June 23, 2011

Finishing Touches

Some of our pieces are now for sale at Donna's Yarn and Craft Centre on the north shore in Kamloops.  We were amazed at not only the selection of beautiful yarns she has but some of the many crafty type items as well.

With our shawl pins now going into shops, we were looking at ways to display them better.  Some time ago our sister-in-law gave me some fabric swatch samples and I finally put them to good use with our new idea.


Rather than use the fabric patterns for the front, we used the back side of the fabric and attached cut strips between a folded card.  We then fit the shawl pin through the fabric strip and voila!  a special hanger to show off the shawl pins.


And the back looks really nice as well ....


What do you think?