I decided to spice them up a bit by decorating them so I rummaged through my ribbon and trimmings bin to see what I could find and then added some of my handcrafted buttons as an accent. (Some of the new buttons shown are now listed in our Etsy shop and ArtFire Studio).
This is how I did it so you can dress up your own
flip flops to wear this summer!
Step 1 - Cut two 36" (91 cm) long pieces of 3/4" to 1" wide ribbon. If your ribbon is narrower, you will need it to be longer to allow for wrapping more times. Here I am using a 1" wide organza which really gives a dressy look.
Step 2 - Wrap the ribbon around the strap stem of the flip flop starting from front to back and bringing it back to the front.
Step 3 - Bring the ribbon up and over the front of the straps, crossing the ribbon so they go in opposite directions.
Step 4 - Going in opposite directions, loop the ribbon around each of the straps once as shown.
Step 5 - While keeping the ribbon taught, wrap each of the straps with the ribbon overlapping it as you go.
Step 6 - When you get to the end, loop the ribbon around to tie a loose knot but do not tighten it just yet.
Step 7 - Add some glue inside the knot and then pull it tight. I like to use just a regular fabric type tacky glue that dries clear.
Step 8 - Trim the ribbon ends when the glue is totally dry.
Variation: Here I used a heavier type grosgrain ribbon for these flip flops so rather than tying at the end I instead applied lots of tacky glue and wrapped them around several times to hold. I used binder clips to hold it until the glue was completely dry. If your ribbon wants to fray out at the end, you can apply fray stop or the glue itself can prevent the ribbon from unravelling. Allow to dry and then trim the ends.
Adding Button Decorations
Method 1 - Button with Shank
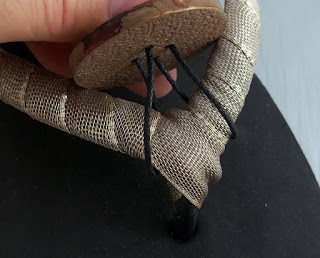
Step 9 - Cut two pieces of 1 mm thick cotton cord or similar each about 8" (20 cm) long. Fold one of the cords in half and place it under the flip flop strap as shown.
Step 10 - Bring the two ends of the cord up through the loop.
Step 11 - Tie your button on and repeat for the other flip flop.
.
Method 2 - Button with 2 Holes
Step 12 - Cut two pieces of cotton cord or string and bring it up the same way as in steps 9 and 10 above.
Step 13 - Bring the cord up through each of the holes.
Step 14 - Tie a square knot and trim.
Method 3 - Buttons with 4 holes
Step 15 - Cut two 8" (20 cm) pieces of cotton cord or string and thread them downwards through two opposite holes (crosswise) of the button as shown.
Step 16 - Place the button over the centre of the flip flop with one string on the right side "behind" the strap and the other on the left side "in front" of the strap.
Step 17 - Bring the strings around the strap and upwards towards the button. Thread the cord up through the other opposite two holes.
Step 18 - Tie a square knot and trim.
Have a flip flop summer time!


11 comments:
Splendido tutorial e bellissima idea... :-D
Very cool! Thanks for the great tutorial.. I am gonna try that!
FANTASTICA IDEA!!!!! me gusta muchisimo, gracias
Muchas gracias y de nada!
Y gracias por su comentos bonitos!
You are welcome Marian. I've received a lot of compliments on my flip flops and they are even more comfortable to wear now with the ribbon instead of the rubber straps.
They are so much fun I'm tempted to go out and buy more colors!
That is awesome! I've wanted to know how to do this for a while after seeing someone else's diy flip-flops. I too love them in the summertime, but am not usually that excited by what I find on the high street: this is the perfect answer! Thank you for sharing :)
You're welcome Beka. Would love to see what you create!
Wonderful tutorial and pics. Thank you!
bellissimo!!!
LOVE the ideas... thanks!! :)
Great tutorial thank you ill be using this to DIY my wedding flip flops that need some jazzing up.
Post a Comment