Thursday, June 29, 2017

Vintage Lace Designs

Our friend Linda was helping with the clay this past month, when she was able to.  She has been in a lot of pain waiting for her hip replacement surgery and she found that playing with the clay was very therapeutic and helped keep her mind off things.  Fortunately her surgery is tomorrow (Friday) and we wish her well with our thoughts and prayers.


These past couple of months with her helping has been a lot of fun and a real blessing!  I first taught her how to condition clay and then to mix up my color recipes.  I had several large bins of scrap clay and she had a ball going through each bin, sorting into piles and then mixing them up to create some new colors.


We were discussing what to do with some of it and I happened to mention to her about the air dry clay and ceramic dishes I had seen online made by texturing with lace doilies.  I have been wanting to try that with the polymer for some time now.  Linda was quite excited about the idea and the next day she came over with a bag full of old vintage doilies!  We started experimenting with them and these were a few of the first ones we made (not finished off yet). 


And this is one that I just finished off the other day.  You can see in the photos how large they really are.


We were wondering what else we could create with the lace and I thought switch plate covers could be cool.  We had fun figuring out various designs to see which ones we liked the best.


Some of these items will be going into the Shuswap Artisan Market in Sorrento this Saturday.  It is Canada Day and Dave and I will be there with all of our special Canada 150 themed pieces to celebrate this big event.  If you are in the area, come on in and see us!


Wednesday, June 28, 2017

Displaying our Larger Size Snaps and Other Items

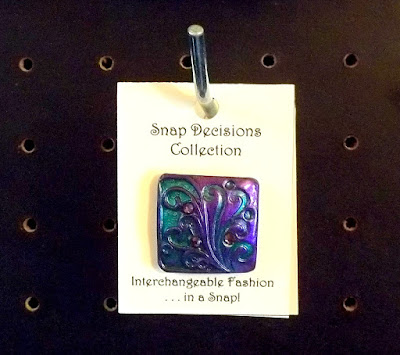
We are always asked how we display our work for selling in stores or for shows.  Many are surprised when we tell them we make all our own cards and print them on our computer.  We find this method the best as we can make them in any size or shape and as many or few at a time.  Now we create even more complicated ones that are cut out with our Silhouette Cameo machine.


But you don't need a fancy machine to make your own cards and this is our latest method used for selling and displaying our interchangeable art snaps.  These ideas not only work for snaps but can also be applied to other pieces such as brooches, earrings and even buttons!

You can see a previous post here where we showed how we display our snaps using the display cards that are available in our online store in the DIY Snap Supply section.


These cards work really well for the regular size snaps and when selling them in groups of three or in pairs but what to do about those irregular shape or larger size ones?  We have found several ways we like to keep them organized in our studio and displaying in shows.  A simple way of organizing is using jewelry trays with dividers.  You can fit quite a few snaps in a tray and additional trays can be stacked.  This looks really nice when putting them out at a show and doesn't take a lot of time with packing and unpacking.


But since we started selling our decorative snaps to several stores, we had to come up with another way to not only display, but also for merchandising.


For this purpose, we designed some simple cards just by using the Word program on our pc computer and then printing out on a heavy card stock.  The simplest way for this is to create a "Table" with squares in the size you want.  Here I fit 8 to a sheet and made them longer so they can fold in half with the fold at the top.


After cutting them out, they are folded in half.  We punch a hole at the top for hanging (optional).  We then punch a hole in the center for inserting the snap.  This hole has to be the right size or the snap will fall out if it is too large.  After a lot of searching, we finally found a hole punch in the correct size (3/16") to fit the snap.


Punch the hole through both thicknesses so the snap is more secure on the card when hanging.


Another cool thing is how the card can turn into a mini stand for display as well!


Here are some extra large snaps we made on larger size cards.  We made them the same way, but with only 4 cards to a page.  They show off nicely when standing up.


You will notice that our cards are very simple and plain looking and for a good reason.  We feel the card is only a background or support for the art piece which is what we really want to show off.  A busy pattern on a card can be very distracting and not show your pieces off very well.

You can also store or display your carded items in trays (or drawer dividers shown here) which is also quick and easy for packing and putting out at shows.


And if you aren't into making your own cards and want something already made, we have some new cards available in our online store in the DIY Snap Supplies section.  These cards are a soft plastic with a plush velvet background and a center hole ready to hang.  Snap jewelry is printed in silver on the front of the card and you can always add a sticker with your name on the very bottom or on the back.  The cards are 1-1/2" wide and the larger snaps on the cards shown below are 1-1/8" and fit quite nicely on them.


I

Creating your pieces in a snap are so much fun and versatile!  Just think of all the possibilities you can do with them!

Monday, June 26, 2017

Framed Art Deco with the CaBezel Molds

We have been creating more snap designs using the CaBezel molds.  These ones are a smaller size made from the Geometric CaBezel.  I recently discovered that my Art Deco designs work beautifully in these!


I found that even though the design was slightly smaller than the cabochon part of the CaBezel, it actually increased the size of the pattern without distorting it!


Since we make a lot of snaps at a time we like to be organized and we make batches of the Bezel Frames at a time in the basic colors (black, purple, blue, etc.) and bake them.  They go into a bin ready to fill with the clay designs and they are even handier now with the snap added to the back!  This way I can see which shape and color frame goes best with the design I am working on.


These CaBezel with the Art Deco Snaps are on the Softglass cord (mini tutorial here) and is cool how you can rotate the snap to create your own look.  This is something you cannot do with a fixed bail.


I like the Softglass cord but sometimes we want a pop of color.  We finally found some beautiful polished cotton wrapped cord in an assortment of rich colors.  We have added a magnetic clasp and snap pendant with the tube bail to create a gorgeous choker style necklace.


These snap necklaces are now available in our online store in a wide assortment of colors.  They are perfect for adding larger size snaps as well as the regular ones.

Friday, June 23, 2017

More Designs in a Snap! and Bonus Offer

My friend Joanne came over to clay with me the other day and brought some templates and textures by Melanie Muir she had recently purchased to play with.  I was immediately drawn to one of the textures and was planning on creating some jewelry pieces in dark blue to go with my summer wardrobe.  I tried one of the templates as well to create a pendant and matching earrings.


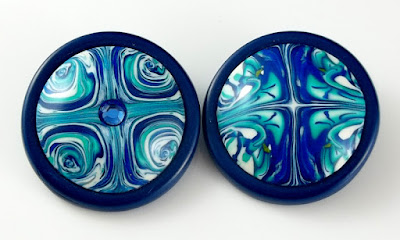
The colors I used to create the mokume gane were the Pantone Spring color Lapis Blue, White Mix (recipe # 1-2 in my Clay Color System) and Kato silver.

Naturally my pendant piece is actually a snap, making it interchangeable.


I like to wear it on a stainless steel necklace chain but I also love to wear it on the frost white softglass cord for a totally different look! 


You will find a mini tutorial I did some time ago on how to add a snap base to the softglass or other cording here.


And of course all the little left-over pieces made great smaller size snaps that I can wear in my other snap base accessories such as a bracelet, hair barrettes, and handbag.


I love my handbags with the snaps and have several in different colors.  These bags are excellent quality (imitation leather) and after using them on a daily basis for a while now they still look like new and are a fun accessory!  They come with 2 interchangeable straps:  One adjustable shoulder and wrist and have 3 zipper pockets.


If you would like one of these bags, we have a special bonus offer!  With a $100 minimum purchase (after any discounts or coupons applied) from our Snap Decisions Collection and/or DIY Snap Supplies, receive a clutch purse ($29.95 value) of your choice at no charge!  No coupon code is required.  Just leave a comment at the checkout which color you would like.  This offer is for 2 days only and ends Sunday midnight (June 25) or while quantities last.  We also have a limited quantity of colors so first come, first served.


By the way, my favorite bag color is the Cedar which is very similar to the Pantone fall color Dusty Cedar.  I find it is more like a dusty rose or burgundy and any clay pieces made with the Pearl Ex mica powder color, Red Russet is a close match.

Monday, June 19, 2017

CaBezel Designs in a Snap - A Learning Curve

I've been experimenting with a new concept using the CaBezel Molds with a snap.  I wanted to see how they would come out if baked on a form to give them a curved shape.  I quite like the end results as it seemed to give them a little more depth.  It is not that the flat designs aren't good -- I just thought it would add more interest to some of the designs.


In my tutorial, "Interchangeable Jewelry in a Snap!", I share my special method for baking the clay snaps so they hold their shape or don't roll around.  Baking pieces with a snap that are curved is a different scenario.  I generally bake these items on a cardboard tube cut in half and then wrapped in parchment paper to prevent the clay from sticking.  So how to balance them on the cardboard tube with a snap on the back?  I found a simple solution:  Punch a hole in the cardboard form for the snap to fit in!


I am quite pleased with my little discovery and now I can bake any curved bead in a snap!

Friday, June 16, 2017

New Dishes Created

I love creating larger items that are functional but finding the time is always an issue.  I finally found some creative play time and decided to make some new dishes.  I discovered that once I started, it got my creative juices flowing and now I have more ideas.

Making items like these require more patience and take a little more time as they generally go through at least 2 bakings but the end product is so worth it!  All of these pieces went to the Shuswap Artisan Market in Sorrento and are already sold so we dropped off a few more pieces today.

Brilliant Rainbow Swirl Dish

Brilliant Rainbow Swirl Dish - Side view

Green Leaves with Lady Bugs Soap or Trinket Dish

Green Leaves with Lady Bugs Soap or Trinket Dish - Side view


Gigantic Bloom Dish in Pink and Lime

Flower Dish in Teal and Lime