Thursday, October 29, 2009

Ready for Christmas...

We've been busy getting ready for our first (and largest) Christmas show of the year coming up this weekend.  Just thought I'd share with you a few new pieces I've been working on.

   
Poinsettia Flower Brooch                      Tartan Plaid Earrings

   
Shiny Christmas present Earrings

   
Some flirty ribbon necklaces


A variety of accessories
Hair barrettes, pill boxes, mirror compacts and pens

   
And some new pill boxes and pens for the men ...

So, will post again next week... in the meantime, have a great weekend.

Sunday, October 25, 2009

More Creations from a Mould

I thought I would share a few more items that were created by making a mould (see my earlier post on Making a Mould and Creating from a Mould ).


I was looking for something to decorate a gift card box for men and found this scrapbooking motorcycle charm in my stash.  I made a mould and then recreated the piece, and highlighted it with silver mica powder.


Since sewing has been my passion for many years I've accumulated a large button collection over that time.  I decided to create a mould from the one in the photo shown above.  It is made out of silver metal with rhinestones.  When I created the mould, I discovered a lacy snowflake pattern which resulted in the earrings shown below.


Thursday, October 22, 2009

Going "green" with my scrap clay - part 3

Similar to making moulds, I also like to make my own texture plates and here are a few that I have made.


For easy identification, I prefer to make my texture plates in different colors.  Polymer Clay Central had a Texture Sheet Swap some time ago and there are a lot of great ideas there.  If you're not sure how to do this, Helen Breil has a great tutorial available.

Similar to texture sheets, you can also use the scrap clay for making reverse textures or moulds from your rubber stamps:


Here are some other ways I like to use my scrap clay:
  • Use as a filler for beads
  • Use as a backing when making a clay sheet 

  • Colors can be mixed into Natasha Beads (This bead was made from left over cane scraps).

  • Build some canes . . .
I like to combine my scrap clay into colors that can compliment or work together -- here is an example:


I separated the colors that might make nice skinner blends or for more mixing.  Here I have three piles of greens that I separated.  I liked the combination of the light and dark greens in the two piles on the left and made some fun leaf and jelly roll canes from them.


There are so many ways to use up your scrap clay, there is never any reason to throw any out.  Of course once it is baked, that is a different case but if it didn't turn out quite like you expected -- then cover it up with a veneer and create a new look!

Because I don't like to waste, I have a rule of thumb to spend a little extra time examining my piece closely before firing making sure it is smooth and nicely finished.  If I have any doubts about my pieces not turning out, I prefer to smoosh it and start over again rather than bake and deal with it later.

Tuesday, October 20, 2009

Creating from a Mould

Since I showed how I make a mould from my scrap clay I thought it was only fitting to follow up with how I create a new piece from my new mould.  This is pretty basic for some but I've picked up a few quick and easy tips from books and mainly by trial and error of experience.  I prefer to use water as a release agent and I find the more water you use, the easier and better the impression.  (*see note below.)
I actually fill the cavity with water and then lay my rolled clay sheet over top.  I then spray the top of the clay so my roller will not stick to the clay. 


Using a lot of pressure (I have to stand up for this), I roll all the way across the clay sheet and mould.


I then cut around my piece and do any other necessary adjusting.


I used some green colored clay and filled in the areas with mica powders to give it a shimmering effect.


My new Christmas package earrings are ready to bake.


* Note:  I should mention that with my experimenting I prefer using water as a release agent with Kato and Premo clays the most.  I found that when I used water with Fimo, the clay tended to "gum up" after and so cornstarch seemed to be a better choice.

Friday, October 16, 2009

Making a Mould -- Going "green" with my scrap clay - part 2

My last post I shared how I love to separate all my scrap clay colors to develop new ones.  Even when this is done I still end up with some ugly looking "mud" type colors.  There are all kinds of uses for this  clay, one of which is using it for making impressions or moulds.

I collect unique buttons or findings that I can make a mould from.  Here is a button I had of a Christmas package that I thought would make cute earrings or charms.  To make a mould from it I start by running my scrap clay through the pasta machine at the thickest setting and stacking 2 or 3 layers -- depending on how deep the impression will be.

I spray my clay with a mould release agent -- I have a spray bottle of water that I like to use.  Take your item and firmly press it into the clay as evenly as possible until you get a nice deep impression.  When you take your piece out, inspect your mould to see if it looks good.  If it doesn't, you can smoosh your clay and then start over and try again.

When the mould looks good, the excess clay is trimmed away so it looks neat and tidy.  After baking I  allow my mould to cool and it is then ready to use.


Here is a photo of some of the many moulds I have made over the years:


Thursday, October 15, 2009

Going "green" with my scrap clay

One of the things I love about working with polymer clay is there is very little wastage of materials.  I'm a pretty frugal person and want to do my part to save the environment so I hate throwing unnecessary things away and try to recycle and reuse any time I can.  Every polymer clay artist ends up with scrap clay and the neat thing is that it never gets thrown out!  It can always be reused in some way and so I thought I would start a series of ideas on what I do with it.  If anyone has other tips to add or links to share, we'd love it if you leave a comment.


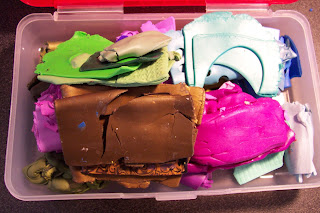
While I'm claying, I generally throw my scraps in a container.  I like this pencil case as the plastic doesn't react with the clay and it has a lid to help keep any dust or lint out.  I don't worry too much about mixing it yet but try to keep the colors separate.

My clay pile was overflowing the other day -- in fact I ended up with 2 boxes full so decided it was time to do something with it.  You can just grab any clay and mix them and end up with all sorts of "mud" colors (browns, etc.) but I like to see what new colors I can end up with.


I first like to sort my clay by colors -- greens, pinks/reds, blues, browns/golds, silver/black, yellows, oranges.  If I don't have enough of a certain color for a pile then I will either set it aside and save it for later or add it to a pile I think will mix in well and not create a mud.


When I have a pile that is too much to mix I will then separate that pile further.  Here I had a lot of pinks so I divided it into light and dark.


I then decided it was still too much, so I divided the pinks into 3 piles and here I now have 3 shades of pink -- one dark and 2 lighter mixes.


I kept mixing my other clay piles the same way and here are all the clay sheets in a variety of colors I ended up with.


Now to store my clay for later use ...   You can wrap them in plastic wrap if you wish.  I like to separate my sheets with pieces of parchment paper to keep them from sticking together and stack them in a basket that I have handy on my table.

Tomorrow I will share more with you on what I can do with all this clay.

Tuesday, October 13, 2009

Making Paisley Buttons

I came across a small handbag in a second time around shop the other day.  The bag wasn't so interesting but what caught my attention was the button that was attached for a closure.  It was quite cheapy looking with a mirrored metallic finish but what I did notice was the great textured design it had.  I had to buy the handbag and as soon as I got home I couldn't wait to make a mould from that button.  Below is a photo of the button on the left and the mould I made on the right.


After baking my mould I had to try it out as soon as it cooled!  I was so amazed at the design I saw that I didn't see in the original piece.  What I saw was one large round button design plus 2 unique paisley shapes within.  I made another impression and then carefully cut around the shapes to make smaller buttons.  I then "painted" them with mica powders to add the rich metallic colors and after baking they were coated with a varathane for a nice shiny finish.


Imagining these buttons on a blouse or sweater!  Or wouldn't they make cute paisley earrings and a pendant !?  Or what about bracelet links?  So many more ideas and all just from one button!

Sunday, October 11, 2009

Snowflake Cane Candle Collar


Here is a candle collar (bobeche) I made with my snowflake canes.  I'm in the process of doing more with it in between all my other projects I'm working on for the upcoming Christmas shows.


Monday, October 5, 2009

Snowflake Cane Tutorial

Fall is here and winter is coming on.  We've been busy preparing for some Christmas shows coming up soon and so I've been busy creating things with winter and Christmas themes.

I was thinking of making a snowflake cane and had been looking around for various ideas.  One of my ways of getting inspiration is going through magazines, flyers and colorful brochures.  I will tear out photos that grab me for one reason or another and sort and file them for later reference.  While going through one sales flyer a photo with a snowflake (shown below) got my attention and I could easily visualize making a cane from this design.


I started with a blue colored clay that has some pearl in it for a nice sheen.  You can also use a transluscent instead but the blue is easier to see in the photos.

1    2 
1.  Form your clay into a round plug about 2" in diameter and 1-1/2" high.  Cut the plug in half down the center.  Separate the halves and make cuts into each piece making both sides equal as shown in the photo.
2.  For the snowflake "veins" I used a mixture of half white and half pearl clay and rolled it out on the #2 setting of my pasta machine which is the second thickest setting.  Cut pieces in the following sizes to fit into the cut areas (see photos 2 & 3):
    2 pieces 1/4" wide  x  1-1/2" (height of you cane)
    2 pieces 3/8" wide x  1-1/2" 
    2 pieces 1/2" wide  x  1-1/2"
    2 pieces 5/8" wide x  1-1/2"
Pinch and taper one side of the long edge of each piece (pic 2).

3    4 
3. Place the white pieces between the blue clay as shown in photo 3 with the tapered ends facing up.
4. For the center vein, use a double thickness of the white/pearl clay and cut a piece 1-1/2" x 1-3/4".  Pinch and taper along the 1-1/2" edge on one side (pic 4).

5    6 
5. Insert the center vein lining up the squared end at the bottom and the tapered end at the top.
6. Press the clay together into a tight round plug again.

7    8 
7. Reduce the cane to about 14" or longer.  Trim off the distorted ends.
9. Cut the remainder into 6 or 8 pieces -- depending on how many sections you want to use.

9 
9. Pinch the top end of each cane piece like forming a flower petal or leaf.

10   11
10. For the snowflake center, make a bulls eye cane with blue as the center (3/8" or 10 mm diameter) and wrapped in the white/pearl rolled out at a #3 PM setting (3rd thickest).
11. Arrange the snowflake cane pieces around the center matching up the stems so they line up and touch the center white.

12   13
12. Fill in around with more blue clay, packing it tightly.
13. Wrap the cane in a sheet of blue clay.

14   15
14.  The cane is now ready to reduce.
15.  Here are my snowflake canes reduced down to several sizes ready to use.