Showing posts with label How we do it. Show all posts

Tuesday, July 21, 2009

Creating Stripe Blend Flowers

In Color Blending, I showed how I take various colors and create a blend. This is one example of how I can use this blend to create some flowers.


I ended the Color Blending demo with this blend of red, white and blue.  I fold it to create a block -- you can see where it is blue at the bottom now, white in the center and red at the top with a gradual blend between.

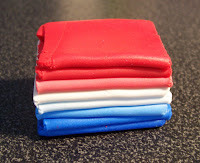
     

I take the block and roll it out so the colors are compressed and stretched out into a log.  I cut the log in half and reshape the clay so it has a striped pattern when you look at it from the end.


I then line them up and press them together to create one log again.  I squeeze and compress that log and stretch it out and cut it in half again.


I press the to pieces together again to create another single log again.  This log gets compressed and stretched again, cut in half and pressed together one more time to create another single log.  You can see there are more stripes forming.


I can keep compressing and stretching this log, cutting in half and pressing together as many times as I want and the more times I do it, the more stripes there will be but the stripes will become thinner.  I decided to stop at this point as I like the look of the stripe pattern.

The striped blend log I created is called a cane.  You can see where I slice this cane and the same pattern goes all the way through.  This cane can be reformed and combined with other canes to create a different one but instead I want to take thicker slices and shape them into flower petals and form a flower pattern.


I add other clay to shape and finish my flowers and for a little sparkle, I embed some Swarovski crystals into the centers.


Saturday, July 4, 2009

Color Blending


Last week I showed you how I mix my colors.  Now I will show you how I take several colors and gradually blend them into one another like a rainbow.

I first make sheets of each clay color with my pasta machine so they all come out the exact same thickness.  I cut them so the colors match up at an angle.  This is so the red and blue will each blend into the white.  I then take my clay and run it through my pasta machine so it comes out as a solid piece.


I take that sheet of clay and fold it in half, keeping the lines all going the same direction, and then I put the fold sheet of clay through the pasta machine again.


I do this many times -- fold in half and run through the pasta machine until the colors start to run together and create a gradual blend.  Here is the sheet that is blended.  But I want to stretch the colors out more so I fold the sheet in half but this time the opposite direction.


I then run that clay again through my pasta machine so it comes out in a long strip.


Next time I will show you how I turned this blended piece of clay into these flowers:


Thursday, June 25, 2009

Mixing Colors


A lot of people are surprised when they see my work and discover they were not painted.  They have a difficult time understanding how it can be done without involving paint whatsoever and so each week I will share with you how this is done through various techniques I use.


This is what the clay I work with looks like.  They contain pure pigments and come in a variety of colors.


You can use these colors straight out of the package or mix your own.  I have my own "recipe" book for my clay so when I mix a color I like, I will bake a sample and glue it onto my "recipe" cards for future reference when I want to make that exact color again.  I have each recipe numbered -- on my card and my left-over mix stored in ziploc bags.


I create my color recipes by first making sheets of colored clays all in the same thickness.  I use a pasta machine for this and I can adjust the settings to whatever thickness I want.


I then use a tool like a cookie cutter to cut out my pieces.  For instance, recipe #12-3 calls for 2 parts Kato Ultra Blue and 1 part White.  I cut out 2 circles in the blue and 1 circle in the white. When I mix those together, I end up with the exact color I want.

I can then do a blend of colors.  For instance, I started with choosing my own mix of primary colors:


YELLOW (a nice golden yellow)
RED (I choose a magenta pink in this case)
BLUE (a turquoise shade)


For the project I was working on, I wanted a little more control over the secondary colors so I mixed up my own blends for those and now I have 6 colors that are all balanced.


I took a strip of each of those colors and placed them side by side (like in a rainbow) and ran them through my pasta machine several times and created this blend.


And this is what I created from the above blended colors.

If you have any questions about this, please feel free to leave a comment below and I will try to answer.  

Wednesday, June 24, 2009

Introducing our "How we do it" Series


Since summer has arrived, we have been spending a lot of time outdoors and getting to know many of our great neighbors living around us.  One of our new neighbor friends was visiting the other day and I was showing her my work in the studio.  What surprised her the most was how much work was involved in making each piece and she thought that a lot of it was painted.

She then asked a question that made me stop and think.  She wondered if people who see my art really understand how much work goes into each item I make.   So that got me thinking of how I can share with you what goes into creating a piece.  I know that our work sells much easier when a person can actually hold it in their hands and touch and feel it or even try it on.  One cannot do that when buying over the internet (as in our Art Fire Studio) and they must rely on photographs only.  That is maybe why most of our customers are repeat ones as they already know first hand the quality of our work.

So I decided to post a series on our blog where once a week I will give you an insider's view of our studio and how our pieces are made right down to the finishing details, so hopefully you will come away with a better understanding of our techniques and the materials we use.  Tomorrow I will start by sharing with you how I arrive at the colors I use and eventually how it is possible to create the flowers on the pieces shown above without using a drop of paint.