Showing posts with label Creating Interchangeable Polymer Clay Jewelry in a Snap. Show all posts

Monday, September 21, 2015

Make Your Scarf Jewelry Interchangeable!

Next to our new Snap Decisions Collection, our scarf jewelry is still a popular selling items at shows.  Since publishing my tutorial, Constructing Accent Pieces for Your Scarves, Sweaters & Shawls, we discovered a special clip finding that could make our designs interchangeable.  And now with our snap base pendants, we can combine the two making them even more versatile!


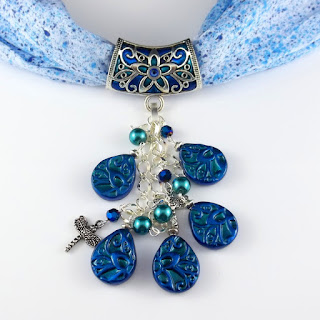
This scarf necklace is one of my favorites -- We filled the metal scarf bail from behind with clay and then added color with mica powders.  The Swarovski crystal was added later with Apoxy clay.  To create the matching clay beads in the cascade, I made my own texture stamps from the metal bail (see page 45 of my tutorial).


Using the special clip type clasp, the bead cascade can be removed and interchanged with any of our "snap" base pendants for a different look.


We now have a supply of these special clips available in our new online store along with other supplies that are hard to find and used in our tutorials.  Be sure to sign up for our newsletter so you don't miss out on any specials or promotions.

Monday, August 17, 2015

Part 2 of my Snap Decisions Tutorial is Now Available!

I am excited to announce that the second part of my "Snap Decisions" tutorial is now finished and available!  In part 1 of the lesson I show how to create interchangeable polymer clay jewelry that are mounted on snap findings.  Any clay technique can be applied to the snaps which is what makes it so versatile.


In part 2 of this 40 page lesson I show you how to create your own "snap" base findings from polymer clay.  You can make your own pendants, bracelet links and even rings from clay with a snap base embedded for interchanging your snap cabochons.  This is great if you would like to use less of the commercial findings and create your own look or style.


If you already purchased the first part of my tutorial, I would've e-mailed you a coupon code for a discount on the second part.  If you did not receive it, please contact us and we will get that to you.

If you have not purchased the first part of my tutorial we now have it available as a set of both part 1 and 2 at a discounted price.


All of my tutorials are available in our Etsy Shop (as an instant download) and in our online store (sent out direct by e-mail). 

Follow our blog for more inspiration, tips and ideas to create your own interchangeable snap pieces based on these two tutorials.  If you don't want to miss any of our postings, you can sign up and have them sent to you by direct e-mail (fill out your e-mail address on the top right hand side of our blog). 


Wednesday, August 12, 2015

Little Posie Snaps

These are our new little mini flower "snaps" for our interchange jewelry that we are calling our little Posies.  We made a small flower mold to form each posie in a consistent size.  Each flower is individually cut out and then placed on top of a "prepped snap bezel B" (see our tutorial on page 5) that was textured.  A Swarovski crystal was added to the center of each posie.


"Snap" Bracelet

"Snap" Bangle

Saturday, August 8, 2015

Winner of Part 2 Snap Decisions Tutorial Announced!

So we are now ready to announce the winners of our contest.  Anyone who purchased our tutorial, "Creating Interchangeable Polymer Clay Jewelry . . . in a Snap" was entered into a draw for a chance to win a free copy of part 2 of our tutorial, "Make Your Own Snap Base Findings from Polymer Clay".

We said we would draw 3 names out of the bunch and ....  (drum roll) ... here they are:

Sharon Robinson
Geri Johnson
Kendra Cookman

Congratulations!  We have already contacted each of the above winners.  In the meantime, everyone else who purchased my tutorial will be receiving a personalized message from us with a coupon code for a discount on our part 2 tutorial.

Now regarding our next tutorial.  It is still not quite ready to publish yet.  This is due to something special we are having created for it and has taken a little longer than expected.  As soon as it is ready the above winners will receive their copy by direct e-mail and we will announce when it is available.


Part 2 Tutorial
Coming Soon!


Sunday, July 26, 2015

Playing with Silkscreens

I first learned screen printing in art class many years ago so I was curious about applying it to polymer clay.  I thought using the new Sculpey silkscreen kit would be a good way to start and so we gave it a try.  We really liked the paint that came with the kit -- especially the silver and some of the patterns were very intricate and was impressed with the fine detail they gave.


We had a lot of fun trying out the different patterns and experimenting with different colors.  Helen Breil gives a good basic tutorial and tips on coloring on her website here.

The disappointing thing, however, was after using some of the patterns from the Sculpey kit repeatedly, we noticed the silkscreens were quickly deteriorating and the backing was pealing off. We were extremely careful handling them and would put them in water immediately after each use so the paint would easily wash off.

I really love using the texture sheets by Helen Breil and decided to give her new silkscreens a try.  As soon as I opened the package and handled them, I could tell they were a much higher quality from the ones that were in the Sculpey kit.  We made a few buttons to start.  These are both curved into a concave shape.


We then decided to make some of the prints into snaps for our Snap Decisions interchangeable jewelry.  These ones were made with silver paint and then mica powdered.  The buttons above were left smooth where the ones below were textured so gave a more muted softer look which reminded me of a silk fabric.


Here are some of the snaps in a few pieces of snap base findings.  I love how they can be interchanged and worn so many ways.  We have these and many more styles to choose from in our online shop.

"Snaps" worn as a Ring, Necklace or Hair Barrette
We are working on getting in more snap supplies and have added another Snap Starter Kit (#5)


The single and double loop snap links (#6 & #7 above) have turned out quite popular so we will have them available in bulk when our order arrives.  They work great for making your own bracelets or as earrings:


These starter kits are at a reduced cost and a great way to sample some of the findings or if you would just like to create some interchangeable jewelry for yourself or as gifts.  We created them to go along with my latest tutorial:  Interchangeable Jewelry Pieces from Polymer Clay ... in a Snap!!!


And there is still time for a chance to win (out of 3) our part 2 tutorial.  You can read all about it on a previous blog post here.

Friday, July 17, 2015

Snap Decisions - Interchanging polymer patterns

Most of our jewelry pieces we make have basically been on a larger scale.  Since working with our new interchangeable "snap" jewelry, however, our focus has slightly changed where many of our "snap" beads or cabochons are smaller than the average pendant.  Creating smaller pieces has its challenges but also its good points.  Working on a smaller scale you have less area for a pattern to show off well so you need to rethink your designs and come up with ones that fit.  On the brighter side, however, when creating clay veneer sheets it seems we always end up with some of those left-over pieces that are not large enough for earrings or you would like to use them in another way.  We have discovered that some of those really neat left-over designs make beautiful "snaps" for our interchangeable jewelry.


These "snaps" have a simple bezel frame and we have found an easy way to fill them with our clay patterns without using any glue.  They are fun to mix and match and wear in different ways like a ring, bracelet, hair barrette or necklace.  This is one of  the cabochon methods I share in my latest tutorial, "Creating Interchangeable Polymer Clay Jewelry in a Snap".  You can read more about it in my last blog post and the chance to win one of three give-a-ways of my Part 2 lesson that will be published soon.