Monday, September 28, 2009

Mokume-gane


Mokume-gane, meaning "wood-grain metal", is a Japanese metal smithing technique where layers of different types of metals are compressed and fused to create beautiful patterns.  This is another technique that we like to imitate with polymer clay as it can be done in so many ways with a wide variety of color combinations.

After selecting my clay colors, I make them in sheets all the same size, varying the thickness depending on the color, and then stack them.


I roll out and compress my sheets so they will fit through my pasta machine.  The stack is put through the pasta machine to compress them even more.  It is cut in half, stacked, compressed and rolled through the pasta machine again.  This is done one or two more times, sometimes adding silver, gold or copper leaf in between towards the end of the process like in the blue bracelet shown above.


The next stage is to impress the layered clay to create a pattern.  Here I've used a texture sheet with a floral design.  I have to use some sort of mould release so it won't stick in which I simply spray on water.


Using a special blade, I shave off the raised areas that the texture sheet created, revealing a pattern underneath.  I then flip these shaved pieces over and arrange them onto another sheet of clay creating a second design.


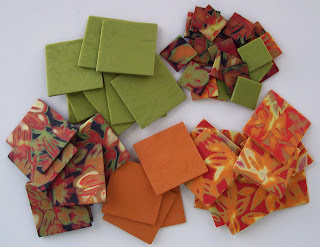
When I have my sheets the way I like them, I smooth them out with my roller and now they are ready to use in my designs.  Here I have some tiles ready to bake for my mosaic coffee table.


And more tiles that have been sanded smooth and ready to use.

Or how about some pendants...


Thursday, September 24, 2009

Making a Plaid Cane


I love all kinds of tartan plaids, especially the ones in rich colors so I've been experimenting with different ways of imitating this warm fabric in my clay.

Here are several online tutorials I've come across on the internet:

Plaid Cane  by Polymer Clay Express

School Spirit Cane by Lisa Clarke at Polka Dot Creations

Violet Tartan Plaid Cane  by  Kro K Do  (in french)

Plaid Cane by Dora's Explorations

I decided to give Dora's cane tutorial a try and I must say I am impressed with how she worked this complicated type of cane out.  I followed her instructions choosing peridot green, olive green and dark red as my three colors.  I really love how it turned out but I found the colors came out a little darker after baking than what I was aiming for.  I also have to agree with Dora that it is very difficult to keep the lines straight while reducing the cane.  I have an idea I want to try for my next attempt and will keep you posted.


Monday, September 21, 2009

Flowers for Fall

I love this time of year when the days are warm but not too hot and we become surrounded with all the colorful autumn leaves and fall flowers.  I'm working on some new fall colors and this is a bangle that is now listed in our Art Fire Studio.  I came across these gorgeous metal bangles some time ago.  They have a strong spring hinge on them so they stay closed while wearing but are easy to put on and take off.  Unfortunately I only have one size in stock and they fit a small to medium size wrist.  The inside measurement is 6-5/8".  


Of course if you would like to make your own bracelet, this tiled bead set is for sale in our Etsy Shop.  There are 7 tiles -- plenty for a gorgeous fall bracelet.  It is also reversible so if you want a plainer look, there is a quilted look texture on the opposite side in the matching warm fall colors.  I strung some beads on to show how they can look.


Saturday, September 19, 2009

My Birthday Present Has Arrived!

Yeaah!  My books arrived in time for my birthday!  I came across the Making Polymer Clay Beads by Carol Blackburn some time ago and fell in love with it.  The photos are fabulous and it is full of so many inspiration ideas.

I was hoping to receive the Polymer Clay Color Inspirations sooner but it wasn't available in Canada until over a week later than the U.S. but I wanted to order it from Canada and save on shipping.  We are really impressed with this book and even though I have a fairly good grasp on mixing colors I feel there is always something new to learn.  I can tell already that this book will be a coffee table favorite when it isn't in use in my studio! 

Thursday, September 17, 2009

Fall & Winter

The weather is still pretty warm and I don't want summer to end but I need to plan for the winter and festive season ahead. I love plaids and apparently they are in fashion this winter so I've been experimenting with imitating this warm and cozy fabric with my clay.


For these earrings and pendant necklace I used a type of marbling technique and then inlaid my red and green strips. I gave the reverse sides a different look by texturing and then highlighting with metallic mica powders. I think they almost look like Christmas tree ornaments.

Next time I will share with you another plaid I created .....

Monday, September 14, 2009

My Stylized Tree


Back in August I demonstrated how to build a cane out of polymer clay.  I made an autumn leaf showing a photo of the cane before it was shaped into leaves.  Joan, a good friend of mine left a comment that the round shape reminded her of a stylized tree.  I didn't visualize that until she mentioned it so I thought why not play on that point of view and this is the result:


Or if you prefer the autumn leaf look, these earrings are now listed in our Art Fire Studio as well:


Sunday, September 13, 2009

Our Birthday Celebration Contest has a Winner!


Joy (catinalife) is the winner of our Birthday Celebration Contest.  Congratulations Joy!

Thanks to everyone who entered!  We really appreciate the nice comments you left.

Thursday, September 10, 2009

Doing the Mica Shift


Another technique I love to do is called a mica shift.  It is also referred to as ghost imaging which I think is a better name.  The pill box shown above is a good example.  The pattern appears to be textured when in fact it is totally smooth.

Only metallic or pearl type clays can be used in this technique due to the mica particles they contain.

To create this effect, the clay is rolled, folded in half and rolled through the pasta machine  many times in order for the micas to be evenly distributed.  The clay sheet is then impressed or stamped with a pattern.

Here I'm using a texture sheet I made from clay.  You can see the raised leaf pattern on the green sheet of clay.


Using a bendable and sharp blade, I carefully shave off all of the raised areas.  If I cut too deep, I will lose some of my pattern.  It takes time, a steady hand and patience to do this but can be very rewarding when it turns out.


The clay sheet below is finished and you can see the leaf images left behind in the clay.  These are some of the tiles I created for my mosaic tiled table ready to bake.


 The tiles are much smoother after sanding and here they are mounted onto the table top.


The necklace below is another example of some mica shift shown in the pendant and the two round beads.


Here is a bracelet that was created with a color blend (green at one end to gold at the opposite)  combined with the mica shift pattern.


The bracelet is attached to a watch face and is a new listing in our Art Fire Studio.


Monday, September 7, 2009

I Love a Challenge!

Our daughter had a pair of earrings that were her absolute favorite.  She called one day and told me that she lost one and wanted me to make her a new pair just like them.  The picture below is the original earring.  It is made out of a thin strong metal with a baked enamel pearl-like finish.


It is nice to know she has so much confidence in what we can do but when I looked at this earring I was wondering how I could imitate it and yet still keep the sleek thinness without it being too fragile?  She also knows that I love a challenge, so of course I told her I would and once I sat down to work, the idea came to me on what to do.

I decided to dress it up a bit and do the fronts using a mica shift technique.  This is a technique that creates a "ghost-like" image in the clay where it appears to be textured but in fact it is silky smooth.   I will show how this is done in our "How We Do It" series later.

I love how the earrings came out and so decided to make a matching pendant which I hung from a navy blue ultrasuede cord and embedded a Swarovski crystal for a little added sparkle.


To finish them off, I decided to add some texture to the backs which gives a slight 3d effect when the earrings swirl around at times.


I am really glad I took on this challenge since it has inspired me to make more of these but with variations in design and color -- something I can really have fun with!

We will have some of these fun pieces in our Art Fire Studio soon but in the meantime, enter our Birthday Celebration Contest to win a $25 gift certificate towards anything in our shops.  Contest ends this Saturday evening.

Friday, September 4, 2009

A Birthday Celebration Contest


Since both Dave and I are celebrating our birthdays this month, we thought we would have some fun with a contest.

I recently joined the Art Fire Canadians Guild and discovered Patricia from VerreDesign who is having a really unique promotion.  I like her idea so much we decided to do something similar and give it a try.

We will be giving away a $25 gift certificate** to use towards anything listed in our 2 Good Claymates Art Fire Studio, 2 Good Claymates Beadshop on Etsy or our 2 Good Claymates Beadshop on Art Fire.    To enter, here is what you have to do:

For One Entry (mandatory):
Visit our main Art Fire Studio or Etsy Shop and then come back here and post a comment telling us which pieces you like the most.  Include your e-mail address in your post so we will have a way to contact you if you win.  Please note that you do not have to have a blog to leave a comment or become a follower -- anyone can enter.

For Extra Entries:

ONE more entry if you become a follower on our blog.
     (Already a follower?  You automatically qualify for this extra entry.)

TWO more entries if you become a fan on our Facebook.
     (Already a fan?  You automatically qualify for these two extra entries.)

THREE more entries if you blog about this contest on your own blog and include a link to this contest and a link to either our 2 Good Claymates Art Fire Studio or our 2 Good Claymates Bead Shop on Etsy and comment here with the link to your blog.

FIVE more entries if you make a purchase from any of our 3 shops:


and then come back here and make a comment linking to the item(s) purchased.  You will also get 3 extra entries for each additional item purchased (remember that shipping is charged on the first item only but if you would like to order something from each shop, e-mail us with your request and we can arrange one shipping charge for everything.)

By the way -- if you do purchase an item during this contest and happen to win, we can apply the $25 certificate towards that purchase if you like.

* * * * *

So there are quite a few ways to increase your chances of winning this contest!  And, to sweeten the deal a little more....   If we have more than 50 people enter, we will double your chance of winning and give away two $25 gift certificates**!

This contest is for one week only and closes on Saturday, September 12th, 2009 at 10:00 pm pacific standard time.  The winner(s) will be contacted by e-mail and they will have 48 hours to reply back and claim their prize.  If the winner(s) does not reply within that time frame, a new winner will be chosen.

**Note:  Gift certificate(s) are not redeemable for cash and expire on November 30, 2009.

Tuesday, September 1, 2009

Making Beads

   
My first introduction to polymer clay was through a bead making class at a bead show.  I then joined a polymer clay guild in my area and discovered so many other things to create with this medium but I still enjoy making beads the most.  I've since developed my own style and now use a variety of methods and techniques.  I will show you the basics on how a bead is created to give you an idea of the work that goes into them.

   
Most of my beads involve some sort of cane work.  I shared earlier ("Building a Cane") what a cane is and how it is created.  Here I have a tiger cane I made for some tiger print beads.  For some of my beads I will make a decorative clay "sheet" first to cover them.  Cane slices are carefully laid onto some clay that I have rolled out smooth in my pasta machine.

   
Here is my finished clay sheet that has been rolled out and smoothed.  I then proceed to covering my beads from this clay sheet.  Each bead is measured out so are the same consistent size and then shaped by hand.  I need to make sure there are no air bubbles trapped inside and make them as smooth as possible (unless textured) so they will sand much easier after baking.

   
Instead of making a clay sheet, I will also place my cane slices directly onto my clay background.  I pre-measure my clay first so each bead will be the same size and roll each one by hand into a smooth ball.  Using a super sharp blade, I arrange thin slices from my canes onto the clay ball.

   
I roll the clay ball in my hands again, working and blending the cane slices in until it is smooth. I can shape my bead however I want and then pierce a hole.  If I want larger holes, I can use these holes as a guide and then drill each one by hand after baking.

   
Here are some beads ready to go into the convection oven I use to bake.  All my clay pieces are fired at a precise temperature and observed closely with an oven thermometer.  The oven has to be hot enough for them to cure properly but not too hot or they will burn. 

After baking, the beads are cooled and then sanded for a smoother finish.  We sand each bead by hand using multiple grits of sandpaper.  The beads are then buffed by hand for a matte or satin finish as in the tiger print beads above or buffed with a machine to make them shiny like the ones in the photos below.