Pages

Friday, April 30, 2010

Gone Fishin'

I've been having fun re-organizing all my little findings and such into my new tackle box and I still have room to spare which is a good thing!  This is how I have three of my boxes sorted.

Silver Findings:

Gold (and Copper) Findings:

Czech Crystals:
We love combining Czech fire-polished crystals the most with our clay as they just add that extra bling and sparkle.

I still have one more box that is empty yet and deciding what to use it for.  You will probably notice the small little plastic boxes that say "breakfast, bedtime, etc.".  These are pill boxes I found in the dollar store that are my favorite storage item.  I love to use them for my tiny crimps, findings and seed beads.


While we were on holidays, someone asked a question pertaining to finishing our clay pieces into jewelry -- specifically using the softglass cord.  I have to apologize for not answering as I cannot recall if it was a comment on our blog or an e-mail and I hope they don't think I was ignoring them.  I have been searching my computer for the message and it is nowhere to be found.  If you are reading this, please feel free to contact us again or leave a comment here.  I would love to share some tips on finishing our pieces into chokers, earrings, etc.  If any of you are interested, leave a comment and let us know you are and then we will consider it.

Tuesday, April 27, 2010

New Storage Ideas

We are finally back from our mini-vacation.  We made a trip south of the Canadian border to Spokane, Washington and Coeur D'Alene, Idaho -- two of our favorite cities in the U.S.

We had a chance to visit with family, do some shopping and just kick up our heels for a few days.  The Swedish massage Dave treated me to was an extra bonus and very much enjoyed and appreciated!  We came back with lots of goodies for claying and organizing the studio.  The only thing I brought back with me that I wish I could've left behind was the lovely head cold I came down with.

I'm still unpacking and catching up on things but can't wait to get back to my clay table.  I've been working out a plan for re-designing our studio.  After a year and a half I finally decided it needed some revamping to make it a little more organized and functional.  It will be a major moving job with the furnishings but should be much better after it is complete.

After the last huge show we did, I got to thinking about looking for a type of "case" to organize some of my beads and jewelry findings.  I want it to sit on my beading table but quickly pack up and go with me to a show if needed.

All the craft supply cases seemed so small and didn't seem to suit my needs.  Our niece suggested to us that we maybe should be looking at tackle boxes used for fishing.  I never would have thought of that so we started looking in some of the sporting goods stores in the area.  We were so overwhelmed when we walked into some of these stores.  Some of them were bigger than a Walmart and they contained nothing but supplies for fishing, hunting and camping.  They had several aisles of different tackle boxes to look at and we finally found just the right one.  It has four large cases with the little dividers in them as well as storage up top which is perfect for tools and other bulkier supplies.


The cases fit into the tackle box like drawers and also lock up so the little pieces won't fall out and go all over the place.  One thing to look for in these type of cases is the bottom to make sure the edges are curved.  This makes it much easier for picking out tiny beads from the compartments.

I just started to organize my findings in it and will share more on that with you as soon as it is done.

Friday, April 23, 2010

Lentil Swirl Chokers

There is something addicting about making lentil swirls.  It seems once you get the hang of it you have this drive to experiment with new color combinations.  I decided to combine some of these swirl pendants  with the new steel cables we've been using.  They make a nice simple choker that is lightweight and comfortable to wear.  You can see some more in our Wearable Art Gallery.


Wednesday, April 21, 2010

Some Pop Art Chokers

I've been experimenting with a technique that Julie Picarello taught us in the workshop I attended last year. Hers look a lot like lizard tails.  I've added a twist (sideways that is) using the Pantone Spring 2010 colors and came up with these collar-like chokers that have more of a pop art look to them.  They are fun and a little addicting to make.  You can view a few more of these in our Wearable Art Gallery.


Monday, April 19, 2010

Some yummy colors

We are on vacation this week and enjoying some time relaxing and visiting with family.  Of course I had to make myself some new pieces to wear on our trip.  I have a matching watch bracelet that goes with  this choker, earrings and hair barrette but didn't get it put together yet.  I can't seem to take a holiday without taking some things with me so I don't get bored, so packed some reading material as well as some beads to assemble a few jewelry pieces.  Will show more of those new pieces later.

Friday, April 16, 2010

Double-sided Textured Bead Tutorial Now Available

I've been working on several tutorials lately and happy to announce that one of them is finished and for sale on Clay Lessons (click on the photo below for the link) as well as in our Etsy Shop and Art Fire Studio.  The tutorial is on creating my lentil beads that are textured on both sides and perfectly seamless.  The good news is that there is no sanding involved yet they are smooth to touch.   I teach you how to create your own moulds from various objects you might have in your house so each bead you create would be your own original design.  A handy color guide is included in the lesson.


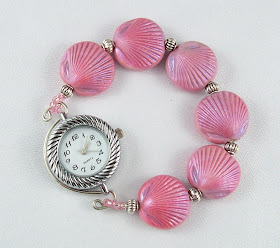
The beads created in this tutorial shimmer like glass but can also look like ceramic, depending on the colors and finish you use.  You could also antique them to give them a totally different look -- the sky is your limit.  I first got the idea from a bracelet I saw once that had the most gorgeous glass beads.  I decided I had to find a way to imitate them.  I've used these beads for my interchangeable watch bracelets but have used them in regular bracelets, necklaces and earrings as well.


If you prefer to buy these beads already made, they are for sale in our Etsy Shop.  I can also make them in almost any color you prefer a custom order.

Sunday, April 11, 2010

Watch bracelet tutorial is now available

Update (2019):

My watch bracelet tutorial use to be available on Jewelry Lessons which does not exist any more.  I will have it available soon in my online store.


This is a new design concept I came up with over a year ago.  I use to make interchangeable watch bracelets with the typical lobster claw but my wrist is small and there wasn't room left for very many beads.  This new design is different in where the watch face is "framed" with wire and the bracelets then interchange on the loops created.


The beads I use for these bracelets are available in our online store  as well as some watch faces that are already "framed" in case you don't want to do your own (will be listed soon).

Hope you have fun with this one...

Friday, April 9, 2010

A Fun Swap

I just received a fun package in the mail today.  It arrived from Sandy who is a fellow Canadian clay friend I've connected with over the internet.  I am an avid follower on her blog,  Simple Inspirations by Sandy and she checks up on mine as well.  We decided some time ago to arrange a swap between us.  She requested a pair of earrings from myself and I asked for one of her gorgeous landscape canes.  I can't show you the earrings I sent her as she hasn't received them yet and I don't want to spoil the surprise.

My goody package arrived in the mail today and Dave and I were both in awe when we opened it.  She ended up sending several canes and they are more beautiful in real than seeing them in a photo.


One of the arrangements we made is that I will demonstrate on my blog how I can use her canes to turn them into finished jewelry pieces.  I am going to have a lot of fun with this and can't wait to get started!

So stay tuned and you will see these beauties transformed into wearable pieces of art.

Wednesday, April 7, 2010

Some New Tutorials Coming

We've been getting a lot of positive feedback from the tutorials I've provided here on this blog.  I am so glad that many of you have not only appreciated them but have even tried them out.  I plan to still provide some free tips and tutorials now and then but I've also been working on some new ones that I will be making available for sale.  I'm excited to announce that I have been approved as a Teacher for both Jewelry Lessons and Clay Lessons.  I've been busy writing some new tutorials that will be available soon through these two sites as well as our Etsy Shop.  I thought I would give you a sneak preview on what is to come:


I love to make watch bracelets that match my other jewelry and accessories and found a simple and fun way to make them interchangeable without using lobster claws.  The design looks elegant yet is very secure.  I have been wearing this type of watch bracelet for over a year now and have never had any problems but have received many compliments.  We presented them for sale at our last show at the World Masters and they were a real hit.


There are several styles of beads I like to create to use for these watch bracelets.  Tutorials on how to make these will also be available soon through Clay Lessons and our Etsy shop.  These beads also look  great in other jewelry designs such as bracelets, necklaces and earrings as well.

Monday, April 5, 2010

Another Color Variation of the Extruded Swirl Cane

Here is the other color combo I did with the Extruded Swirl Cane Tutorial I shared with you last week.  I did this one in the Pantone Spring 2010 colors of Tomato Puree, Fusion Coral and Pink Champagne and used the same three extruder dies as the last cane experiment.


This color combo is a little more subtle and makes a nice soft blend.  Here are some pieces I made with the above canes.  I only did a small cane for this one as an experiment but I still managed to make a few things with it.  I decided to put some cane slices on a black background to really make the colors pop a little more and added some bling with some rhinestones.


It was fun experimenting with this technique and I'm starting to see more possibilities with it that I might try out later.

Sunday, April 4, 2010

Variation on the Extruded Swirl Cane Tutorial

I've been working on some color and extruder variations since I shared the last tutorial with you.  I used a three color combination this time -- A thin sheet of black (#4 setting on the pasta machine) and a layer each of Turquoise and my own color mix of copper (both #2 thickness on the past machine).    I also experimented with a couple more dies.  It was my first time using the large square die from a set I recently purchased and the pattern came out almost the same as the small square except it was actually easier to extrude.


Here are a few pieces I created with my new canes ready to bake.