In Color Blending, I showed how I take various colors and create a blend. This is one example of how I can use this blend to create some flowers.

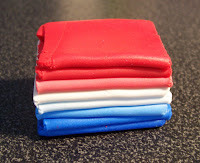
I ended the Color Blending demo with this blend of red, white and blue. I fold it to create a block -- you can see where it is blue at the bottom now, white in the center and red at the top with a gradual blend between.


I take the block and roll it out so the colors are compressed and stretched out into a log. I cut the log in half and reshape the clay so it has a striped pattern when you look at it from the end.


I then line them up and press them together to create one log again. I squeeze and compress that log and stretch it out and cut it in half again.


I press the to pieces together again to create another single log again. This log gets compressed and stretched again, cut in half and pressed together one more time to create another single log. You can see there are more stripes forming.


I can keep compressing and stretching this log, cutting in half and pressing together as many times as I want and the more times I do it, the more stripes there will be but the stripes will become thinner. I decided to stop at this point as I like the look of the stripe pattern.
The striped blend log I created is called a cane. You can see where I slice this cane and the same pattern goes all the way through. This cane can be reformed and combined with other canes to create a different one but instead I want to take thicker slices and shape them into flower petals and form a flower pattern.


I add other clay to shape and finish my flowers and for a little sparkle, I embed some Swarovski crystals into the centers.


Great Tutorial! Thanks for showing us :)
ReplyDeleteThanks Cindi, Actually wasn't intending for it to be a tutorial but a good artist like yourself can follow and understand easily enough. It is part of a series, "How we do it" we started for our customers' benefit since so many people look at our work and cannot understand how it is created without any paint.
ReplyDelete