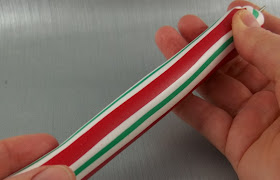
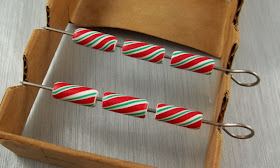
Here is how you can make your own:
1. Make a "log" of white clay about the size of a large marshmallow and pierce it through the center with a steel mandrel or thin knitting needle.
2. Roll out some white, red and green clay (see color recipes below) on the 2nd or 3rd thickest setting of your pasta machine. Cut a length of each color slightly wider than the clay plug.
3. Cut strips from each of the colors and arrange them around your clay plug. I like to start with the red. I cut 4 strips at about 1/4" wide and arranged them equidistantly around the plug.
4. Fill in the gaps with narrower strips of green.
5. Fill in the final gaps with white. Roll a bit to smooth it out so there are no spaces between the colors.
6. Now roll out your clay plug by rolling it on the table and then lightly stretching it. Keep repeating this process until you have a nice long tube.
When it becomes too long for the mandrel, cut it in half and set one half aside.
At this point I like to trim each end off where you can see it is distorted but this is optional.
Keep the other half on the mandrel and continue rolling and stretching until it is the thickness you are happy with. At this point I like to twist it to give that nice candy cane swirl look.
Your beads are ready to bake, sand and finish. Make sure you "tent" your beads with some aluminum foil when baking to keep the clay as white as possible. You can also bake them in a pan filled with baking soda (be sure to cover the pan with foil during baking).
Tip: With some clays like Premo, the red tends to bleed into the white. I have found the white comes out much cleaner when working with Kato clay which is another plus. If it does "bleed" a bit, the white will generally come clean again after sanding.
Color Recipes: (Here are the ones I used but you can mix up your own)
Plug: Kato white
White: White Mix, Recipe # 1-2
Red: Tomato Puree, Recipe # 4-6 (increase the red to 5 parts)
Green: Christmas Green, Recipe # 7-5
** Above recipes found in my Clay Color System


So very cute. Have a strange craving for peppermint now...
ReplyDeleteI am so new to colored clay, I thought this would be a complicated process when I first saw the beads. It's looks easy enough for me to handle. Going to give it a try. Thank you for the tutorial and the yummy eye candy!
ReplyDeleteThank you so much for the tutorial! They really do look like peppermint!
ReplyDeleteThey do look lovely... Thanks for the share...
ReplyDeleteMath Practice
Thank so much for sharing your tute on making the bright and seasonal candy cane beads. It was also good to find out about your Kato colour mixing and rondelle tutes. Gotta put them on my wish list for Santa.
ReplyDeleteYou are all welcome. I made a candy cane necklace and earrings for myself and some people actually thought I had strung candy cane pieces. lol!
ReplyDeleteThanks, Carolyn! These are just soooo cute! :) I'm going to have to make some...oiks....soon! xoxo
ReplyDelete5 little girls love playing with clay. They have created the cutest little dolls with them. I think they would LOVE to create their own beads. Thanks for the visual tutorial! We are posting this link on our site found here @ http://www.holiday-kids-crafts.com/candy-cane-crafts.html
ReplyDeleteThank you for generously sharing this tutorial! It is beautiful and I will definitely make it next year!
ReplyDeleteI found this post last night. Today I made many many tubular beads in wild and wacky colors for Beads of Courage, an organization that serves kids with cancer. The kids get a bead every time they have a needle stick or other procedure. Thanks for helping me serve the kids. You can see my post with a photo on my blog www.ladyflowersbysusan.wordpress.com . I'd be glad to send you a nice picture of the beads if you like.
ReplyDeleteThat is so cool Susan! It is so neat to know that I was able to be a part - even in a small way - of what you are doing for all those children.
ReplyDeleteThank-you so much for sharing and I would like to blog about it soon if that is good with you.