I'm up to my eyeballs in lizard tails and making faux turquoise. Will have some more new stuff to show you soon.
In the meantime, I came across this video on carved candles the other day and it really got my mind whirling and thinking about how this could be applied to polymer clay.

Friday, February 25, 2011
Wednesday, February 23, 2011
Making More Buttons
I've been making my own polymer clay buttons and wearing them on my own clothing for a few years now and love how they look. What I like most is how I can even coordinate them with my jewelry.
A quilting store in our area is now carrying some of our buttons which I specially for them. Here are a few of my favorites that are all very large and measure around 2 inches which look great on quilted bags.


Some of these will be available in our Etsy shop as soon as I can make up some more.
Polymer clay works great for making buttons and if you are a newbie and want to learn how to make proper ones that won't fall apart in the wash as well as look good, Lisa Clarke of Polka Dot Cottage is running a free 5 week tutorial on her blog. You will find her first lesson here. Second lesson here, and her most recent third lesson here.
If you are a more advanced clayer or want to go to the next level, I have a tutorial I published called "Making Beautiful Buttons". It is available in both our ArtFire Studio as well as our Etsy shop.
A quilting store in our area is now carrying some of our buttons which I specially for them. Here are a few of my favorites that are all very large and measure around 2 inches which look great on quilted bags.


Polymer clay works great for making buttons and if you are a newbie and want to learn how to make proper ones that won't fall apart in the wash as well as look good, Lisa Clarke of Polka Dot Cottage is running a free 5 week tutorial on her blog. You will find her first lesson here. Second lesson here, and her most recent third lesson here.
If you are a more advanced clayer or want to go to the next level, I have a tutorial I published called "Making Beautiful Buttons". It is available in both our ArtFire Studio as well as our Etsy shop.
Tuesday, February 22, 2011
Album tip for my Clay Color System Tutorial

I've been getting a lot of positive feedback on my latest tutorial, Carolyn's Clay Color System.
These are a few comments we've received so far (now for some shameless self-promotion):
"Quick delivery and a lot of fun. My photo album is filling up nicely!"
"Excellent tutorial. Great way to learn about color and organize your clay stash!"
"I'm so excited. I have always been afraid of dealing with color. I know what I like; I just don't know how to get there. You just opened the door for me! ...... I'm impressed with your system. Worth every penny."
"Just received my new color tutorial.... I can't wait to get in and start mixing some clay together and fix myself up the recipe cards...."
"I finally had a chance to look at your Color System Tute that I bought. It's SUPER! I am actually going to follow all the steps. :) Thanks for making it for us. I recommend it HIGHLY!
I did receive an e-mail today, however from someone who was having difficulty finding a photo album that is 3 photos per page. If that is a problem I have a solution.
You can always go with a photo album that is 2 photos per page and then use 2 pages instead of the one for every color. This will give you room to hold 4 cards per color instead of the 3 and you will have room for more color recipes to add later. You can print out the blank cards on page 47 to use as the 4th card for each of the colors. If you go this way, you will still only need 12 pages total for your album.
The binder type albums are best so you can add more pages for other things like keeping some of your color mixing charts, etc.
If you have any questions or more comments regarding this or any other of my tutorials, please feel free to contact me or leave a comment. We are always happy to hear from you!
Follow up!
I did come up with another file system rather than a binder which I now really like. You can see the post on this here:
http://2goodclaymates.blogspot.ca/2014/11/new-idea-for-clay-color-system-card.html
Sunday, February 20, 2011
More on Textured Tubes

Solution:
Make a copy of the texture plate with regular clay and/or the Sculpey Bake & Bend.Tip:
If I'm going to use my texture for tubes only, I prefer to make the texture sheet a little thicker and out of regular clay as I don't need it to be flexible. I also don't need a large texture plate -- just an area large enough to texture my beads or a pen blank.How:
In this case I wanted my texture to be exactly like the original texture sheet so this is what I did:I studied the texture sheets to see what areas I would want to use and would work well for the tubes. I then made a texture plate of that area from Sculpey Bake & Bend, using my pasta machine so I could get a deep impression.

After baking, I created another texture plate from the one I just made but this time making it with regular clay and running it through my pasta machine again so I could still keep that nice deep impression.

Voila! I now have a texture sheet that is an exact replica of my original but out of regular clay that I can use to make my textured tubes!
And here are some tube beads I created from the new texture sheet....

I have a necklace design in mind for these beads and will show you when it is finished.
Saturday, February 19, 2011
Blog Debris - Beautiful Minds: Stephen Wiltshire
Someone sent us this video link and I had to share it with all of you. It is totally amazing and I'm sure you will be totally blown away like we were! Enjoy!
Thursday, February 17, 2011
One World One Heart Winners
Thanks to everyone who breezed by and took the time to visit us and our blog. It was a pleasure to meet all of you. We appreciate so many of your wonderful comments and we feel we have made some new friends on this One World One Heart event. There are still so many we never had time to visit and plan to carry on with our journey a little longer.


The winner of our lace heart pendant is:

The winner of our lace heart buttons is:

Nan of
And the winner of the funky swirly beads is:

Abigail of
Congratulations to all of you!
Last but not least, we'd like to thank Lisa for her hard work in organizing and running this event for the past five years. It was a great opportunity to meet so many wonderful people with a common thread.
Monday, February 14, 2011
Happy Valentines Day!

This is a special day for Dave and I ... we have been together now for 25 years this Valentines Day. (Our wedding anniversary is at Christmas but we always celebrate both).
It is also the anniversary of this blog.
Happy Valentines Day everyone....
Saturday, February 12, 2011
Textured Tube Tips
I have received a lot of positive feedback on the tutorials I've written and I'm always happy to answer any questions. I've had some people ask if they can sell the beads or buttons they make using my tutorials and my answer is a definite "yes". When you purchase any of my tutorials, you are free to make what I teach and sell it wherever you like.
I want to share with you a few new tips on making the textured tube beads from my tutorial. Some people prefer not to have as large a hole in their bead and I explain in step 4 on page 3 how to prevent this. Softer clays like Premo or Fimo tend to make a larger hole so if that is the case, then I recommend allowing your beads to rest for a few hours to firm up before texturing them.
The large holes are nice if you want to string them on thicker cords but if you want to string your beads on a thinner wire, you can "fill" in the hole at each end with some attached clay rondelles or embed some beads into each end before baking.


Here are a couple of examples showing finished pieces with metal and glass seed beads embedded into the end of each tube.


I've been experimenting with some new textures and if you find that a texture sheet is too flimsy, then try making a reverse texture plate from clay. I had this scrap piece of fabric that was not going to work so I used the Sculpey Bake & Bend to create a texture sheet from it. You can see my previous blog post on how to do this. I am now able to use the texture sheet to create my tube beads.

I will show you my finished beads and more on this later...
I want to share with you a few new tips on making the textured tube beads from my tutorial. Some people prefer not to have as large a hole in their bead and I explain in step 4 on page 3 how to prevent this. Softer clays like Premo or Fimo tend to make a larger hole so if that is the case, then I recommend allowing your beads to rest for a few hours to firm up before texturing them.
The large holes are nice if you want to string them on thicker cords but if you want to string your beads on a thinner wire, you can "fill" in the hole at each end with some attached clay rondelles or embed some beads into each end before baking.
Here are a couple of examples showing finished pieces with metal and glass seed beads embedded into the end of each tube.
I've been experimenting with some new textures and if you find that a texture sheet is too flimsy, then try making a reverse texture plate from clay. I had this scrap piece of fabric that was not going to work so I used the Sculpey Bake & Bend to create a texture sheet from it. You can see my previous blog post on how to do this. I am now able to use the texture sheet to create my tube beads.
I will show you my finished beads and more on this later...
Friday, February 11, 2011
Out of Space
I was working on a blog post today on some tips for making texture tube beads. While uploading some photos I received a message saying we were out of space and I have to buy more. They said it takes 24 hours to take effect so I won't be able to share it with you just yet. In the meantime, wishing you a nice relaxing weekend....
Thursday, February 10, 2011
Blog Debris Thursday
I cannot believe it is Thursday again already! Sometimes I'm up in the night and can't sleep so I catch up on computer time. I hate to admit it but Dave keeps reminding me it is more likely an age thing. I came across this funny video on a friend's facebook page and thought I would share it with you today. Dave and I laughed and felt she was singing about us. I wonder how many hours I spend looking for things (especially in the studio) and he is the one trying to keep his mind sharp with all the crosswords!
Tuesday, February 8, 2011
New Lizard Tail Pieces
I have some tips to share with you on my texture tube beads but I'm not quite ready yet so in the meantime I thought I would show you some of our new pieces we created for our Country Charm Collection. These boot bracelets are made using the Lizard Tail technique Julie Picarello taught at a workshop I attended.

I was also experimenting with some matching scarf slides using the same technique.


I love the "lizard tail" look and am excited to discover more designs using it.
I was also experimenting with some matching scarf slides using the same technique.


I love the "lizard tail" look and am excited to discover more designs using it.
Sunday, February 6, 2011
Make Your Own Flexible Texture Plates
This is how to make your own flexible texture plate so you can use them right in your pasta machine afterwards. For this technique I use ....

That's right ... Sculpey Bake & Bend. It has some really good uses other than making bendable animals... I found they make great texture plates -- and flexible ones at that.
I found these paper heart doilies at the dollar store. I want to use them to make a texture sheet.

1. First of all, make sure the Sculpey Bake & Bend is well conditioned. I find some of the colors aren't quite as soft so I like to mix them until I get a nice consistency.
2. Roll out enough clay in your pasta machine on the 3rd thickest setting (I used the #3 setting on my Atlas) that is slightly larger than the doily.

3. Making a texture plate from one of the paper doilies won't make a deep enough impression so take a stack of about 4 - 5 that are "stuck" together and do not separate them. This will add depth and make a better impression.

4. Lightly dust the clay sheet with some cornstarch to prevent the doily from sticking. I generally use water but with the paper that won't work so well.
5. Change your pasta machine setting to the 4th thickest setting (#4 on an Atlas). Lay the doily face down onto the clay sheet and carefully insert the two together into the pasta machine and roll through.
6. Place your clay sheet facing up on a clean ceramic tile making sure there aren't any air pockets trapped underneath. Lightly tap it so it sticks to the ceramic tile. Carefully peel away the paper doilies and trim the edges all around so they are nice and neat. Bake your texture sheet right on the ceramic tile following the temperature and time on the package.

7. Allow your sheet to cool completely before removing it from the ceramic tile. You now have a texture sheet you can use with your regular polymer clay over and over and it is flexible so can be used right in your pasta machine at your thickest setting.

These are a few pieces I made from my new texture sheet that I highlighted with mica powders.


You can use this method to make other texture sheets. Here is one I made from a piece of vintage lace.


Oh yes, and another cool thing I found is the container from the Sculpey Bake & Bend works great for storing canes afterwards!


I found these paper heart doilies at the dollar store. I want to use them to make a texture sheet.

1. First of all, make sure the Sculpey Bake & Bend is well conditioned. I find some of the colors aren't quite as soft so I like to mix them until I get a nice consistency.
2. Roll out enough clay in your pasta machine on the 3rd thickest setting (I used the #3 setting on my Atlas) that is slightly larger than the doily.

3. Making a texture plate from one of the paper doilies won't make a deep enough impression so take a stack of about 4 - 5 that are "stuck" together and do not separate them. This will add depth and make a better impression.

4. Lightly dust the clay sheet with some cornstarch to prevent the doily from sticking. I generally use water but with the paper that won't work so well.
5. Change your pasta machine setting to the 4th thickest setting (#4 on an Atlas). Lay the doily face down onto the clay sheet and carefully insert the two together into the pasta machine and roll through.
6. Place your clay sheet facing up on a clean ceramic tile making sure there aren't any air pockets trapped underneath. Lightly tap it so it sticks to the ceramic tile. Carefully peel away the paper doilies and trim the edges all around so they are nice and neat. Bake your texture sheet right on the ceramic tile following the temperature and time on the package.

7. Allow your sheet to cool completely before removing it from the ceramic tile. You now have a texture sheet you can use with your regular polymer clay over and over and it is flexible so can be used right in your pasta machine at your thickest setting.

These are a few pieces I made from my new texture sheet that I highlighted with mica powders.

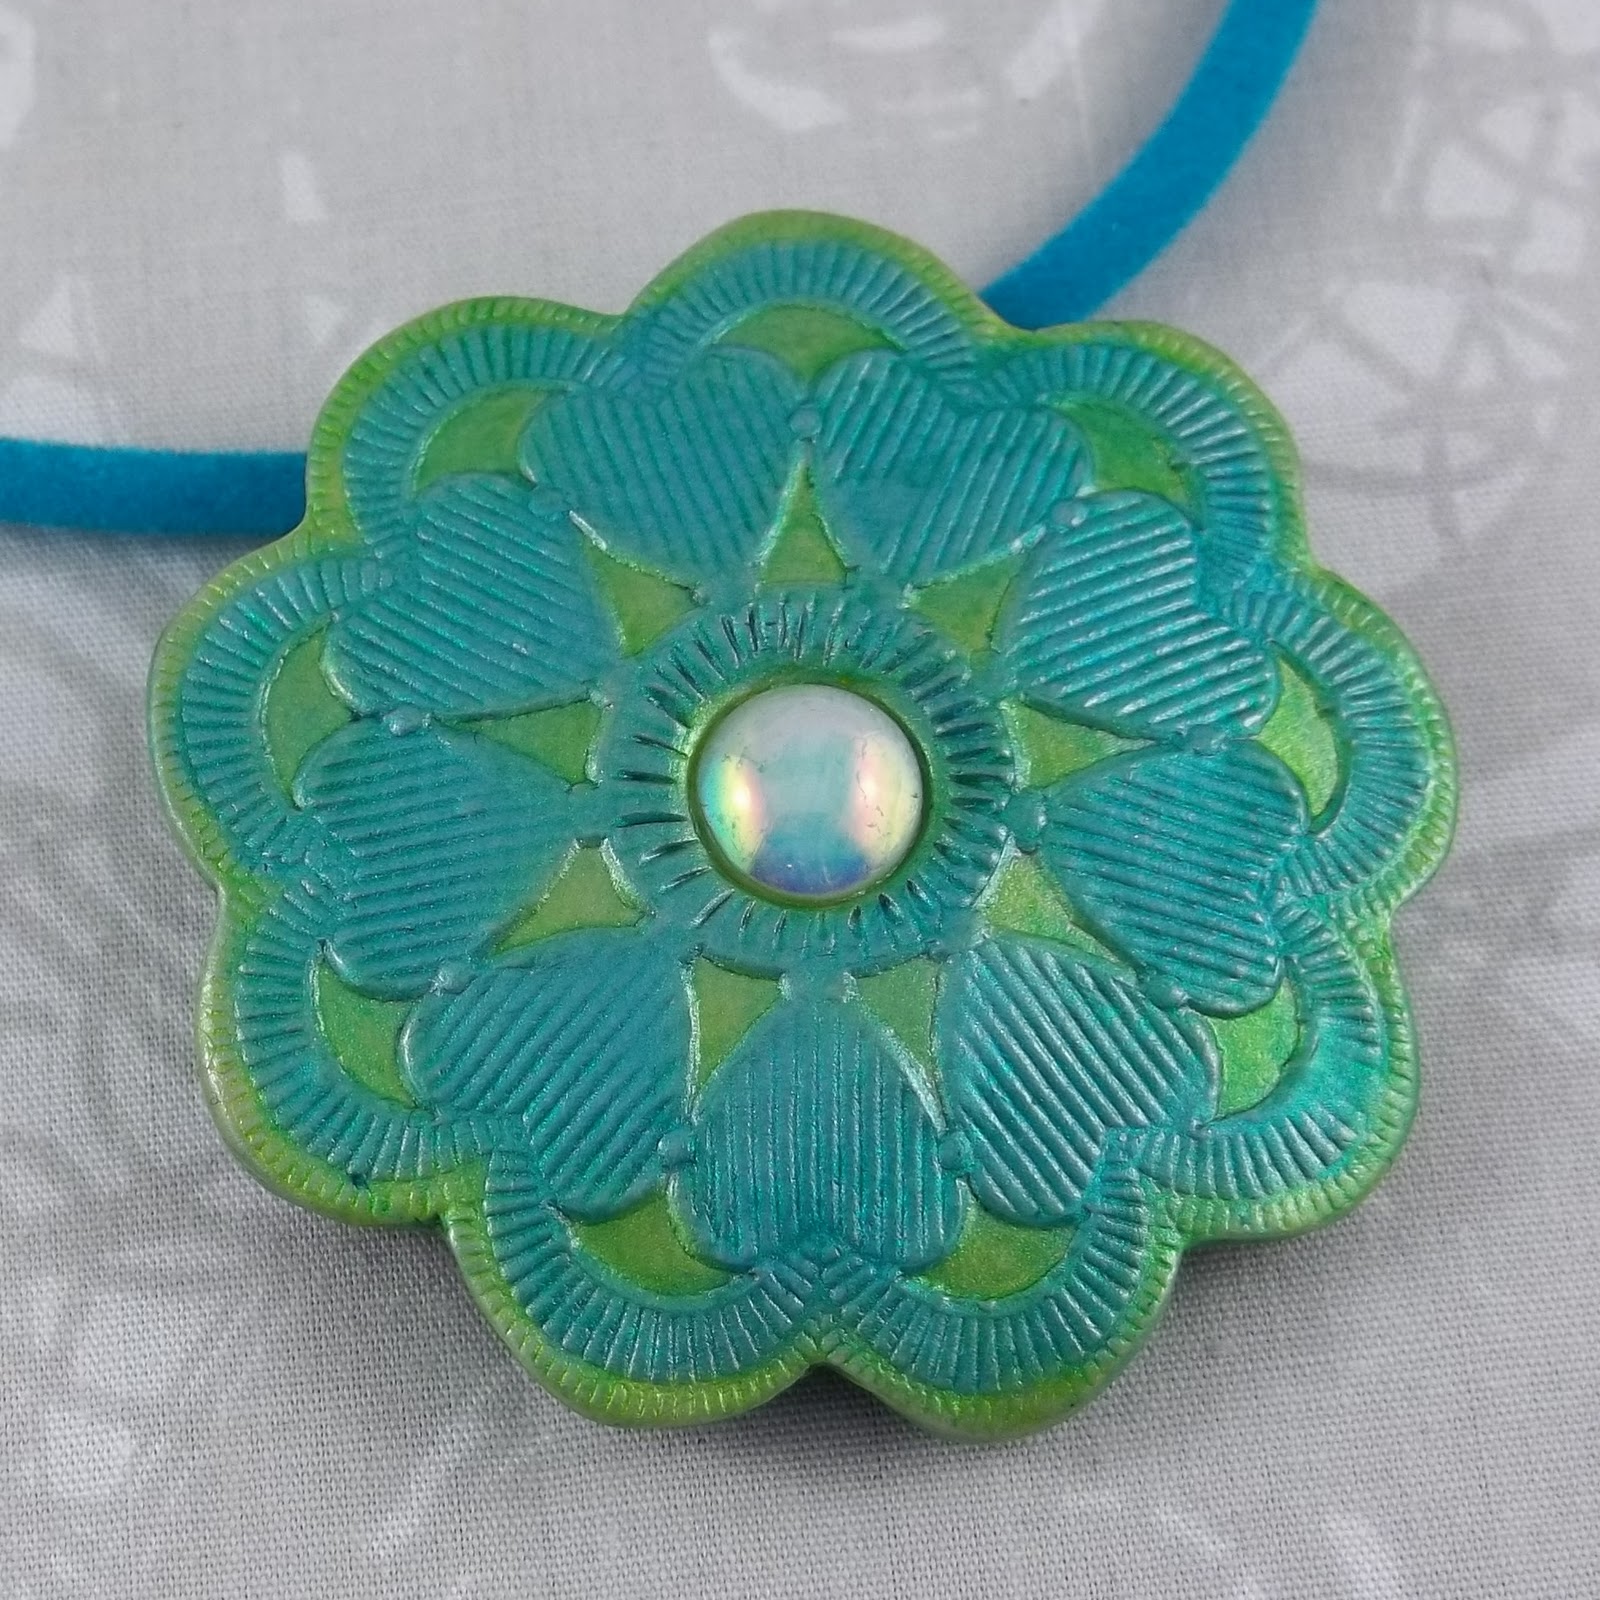

You can use this method to make other texture sheets. Here is one I made from a piece of vintage lace.

And some pendants I have made from it:

Oh yes, and another cool thing I found is the container from the Sculpey Bake & Bend works great for storing canes afterwards!

Hope you enjoyed this little tutorial and have fun with it!
Thursday, February 3, 2011
Blog Debris Thursday
Today I thought I would share a fun blog I came across the other day. It is Mich L in L.A. Michelle creates fun jewelry pieces from recycled objects and has fun with it. Whenever she finds a new object to create something cool she plays a game with her blog followers to see if they can guess what the item is.
Her latest piece is this cool "box" with a totem salmon fish on it.

It caught my eye as that totem symbol is very common here in British Columbia, Canada. I have no clue what the object was originally used for. Can any of you guess? Hop on over to her blog and give your answer if you do. I'm sure you will find it very entertaining!
Her latest piece is this cool "box" with a totem salmon fish on it.
It caught my eye as that totem symbol is very common here in British Columbia, Canada. I have no clue what the object was originally used for. Can any of you guess? Hop on over to her blog and give your answer if you do. I'm sure you will find it very entertaining!
Wednesday, February 2, 2011
More Feather Canes
We're getting ready for the Cowboy Festival and making more feather canes in different colors. I made these using Donna Kato's technique in her book, The Art of Polymer Clay Millefiori Techniques.

Want to know what color combinations I used for these? You will find the recipe numbers listed below in my new tutorial: Carolyn's Clay Color System.
1. Black Mix # 1-8 and White Mix # 1-2 (Silver clay for trim)
2. Dark Golden Brown (see recipe below) and Ecru Mix # 2-8 (Gold clay for trim)
3. Olive Mix # 7-8 and Ecru Mix # 2-8 (Bronze # 2-16 for trim)
4. Teal # 8-4 and Ecru Mix # 2-8 (Shiny Copper # 2-15 for trim)
5. Grape # 10-4 and White Mix # 1-2 (Silver clay for trim)
6. Emerald (see recipe below) and White Mix # 1-2 (Silver clay for trim)
Recipe for Dark Golden Brown:
7 x Mix 3-2
2 x Gold
1 x Black
Recipe for Emerald:
2 x Mix 7-2
1 x Pearl
I'm working on some new Bargello designs and will share those with some more color combos next time.
Subscribe to:
Posts (Atom)