Thursday, July 30, 2009

Summer Floral Garden

Some of our floral designs that are perfect for summer.   They are all included in our 25% off sale as well!  You will find them in the Floral Garden Section of our Art Fire Studio.


Friday, July 24, 2009

Fluorescent Fun


Our oldest grandson was visiting us this week and so between our swimming time in the lake we squeezed in some clay time.  When he was here last summer we made some things together for the first time.  You can see those here.  This time we decided to make a switchplate cover for his room with a gecko on it.  We made the lace cane for the gecko which turned out pretty good. The whitish outline part around the eyes and on his back glow in the dark.  I tried taking night photos of it glowing but I haven't figured out that setting on the camera yet.  Anyone have any tips?

He extruded some clay for the vines and picked out some flower and leaf canes from my boxes and sliced and positioned them where he wanted. The neatest part I like are the flies he made from a little mould I have and placed them on the gecko's tongue and vine!  Something I wouldn't have thought of doing and I like the sense of humor he is developing - takes after his grandfather!


I also had him make a ball of clay and place slices from the cane ends on it and then showed him how to make a lentil swirl.  We were wondering what to do with it when we decided it would make a great glow in the dark fan pull for his room to match his switchplate cover.

He is really into music and has been playing the bass clarinet in the school band and originally wanted to make some musical notes from clay.  I happened to leave a comment on Angela's Crafty Goat's Notes Blog a while ago about some new clay she was trying out by Sculpey called The Bake Shop.  She was kind enough to send me a block of clay to try and it just happened to be black which was perfect for Adam to experiment and play around with.  He really liked it since he could condition it in his hands easy enough and he said it was nice and soft yet it didn't seem too sticky -- especially since our house was a little warm.  The muscial notes shown above was one of the pieces he made with it.  I can see where polymer clay and kids just seem to go hand in hand as our two grandsons love to play with it and it is one of the things they look forward to the most when they visit.  Maybe that is why I like it so much as I can feel like a kid again but still create adult type things!

Tuesday, July 21, 2009

Creating Stripe Blend Flowers

In Color Blending, I showed how I take various colors and create a blend. This is one example of how I can use this blend to create some flowers.


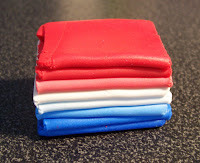
I ended the Color Blending demo with this blend of red, white and blue.  I fold it to create a block -- you can see where it is blue at the bottom now, white in the center and red at the top with a gradual blend between.


I take the block and roll it out so the colors are compressed and stretched out into a log.  I cut the log in half and reshape the clay so it has a striped pattern when you look at it from the end.


I then line them up and press them together to create one log again.  I squeeze and compress that log and stretch it out and cut it in half again.


I press the to pieces together again to create another single log again.  This log gets compressed and stretched again, cut in half and pressed together one more time to create another single log.  You can see there are more stripes forming.


I can keep compressing and stretching this log, cutting in half and pressing together as many times as I want and the more times I do it, the more stripes there will be but the stripes will become thinner.  I decided to stop at this point as I like the look of the stripe pattern.

The striped blend log I created is called a cane.  You can see where I slice this cane and the same pattern goes all the way through.  This cane can be reformed and combined with other canes to create a different one but instead I want to take thicker slices and shape them into flower petals and form a flower pattern.


I add other clay to shape and finish my flowers and for a little sparkle, I embed some Swarovski crystals into the centers.


Friday, July 17, 2009

Spring Bouquet Hair Barrette


The forth piece I entered into the Shuswap Lake Festival of the Arts is this Skewer Hair Barrette.  I've made a variety of these barrettes of which most of them ended up in my own personal collection since I love wearing them and now have a style to go with almost any outfit! Most of them started out as prototypes as I was working out the best size, shape and style.  I feel I have now mastered that part and now have some to sell that will be listed in our Art Fire Studio soon.

Since this barrette was submitted to a juried art show, I made it a little more special with the 3-d effect.  The barrette form was made first and baked separately and then each tulip and leaf are slices from canes I created and then carefully place and applied on top.  I embedded a few Swarovski crystals on the "ribbon" part of the barrette and a much larger jet black Swarovski crystal into the centre of the tulip on the skewer.

I've been looking for ways to photograph and present my skewer style hair barrettes when I met Ali.  She is a bubbly energetic entrepreneur and is really into hair.  She is starting up her own business, Alluring Lengths, specializing in natural and synthetic hair extensions that come in almost any style and color imaginable.    She was kind enough to loan me this hair piece to show off my barrette for the show.


Wednesday, July 15, 2009

Summer Magic


This is another piece I entered into the Shuswap Lake Festival of the Arts which I titled Summer Magic.  I've made several kite bead necklaces before.  You can see them here.  This time however, I decided to have some real fun and play with this one by making them into an actual kite.

I had an original plan for the design but some of the ideas for the individual pieces changed as I worked on them.  I was planning on creating some skinner blend mica shift ones like in a necklace I made a year ago.  I liked how the texture came out on these however and so decided to leave them in this form and highlight the areas with some gold mica powders instead.  I textured and highlighted my tube beads in the same way and added them to the other half of the necklace for a different look rather than have the kite beads go all the way around.  The gold heishi beads and colored crystals add some sparkle and an overall finished look to the piece.


Making my pendant turned out to be the bigger challenge.  I wanted the piece to be wearable and not too heavy.  To get the shape I wanted, I hand-formed my kite shaped mold first.  I then pieced my colored clays to fit over the mold so after firing it would be hollow.  I then used some sculpey light as a filler which really made a difference in the overall weight of the pendant itself.  

I handformed the clasp myself out of gold filled wire and clay and again buried all of the double strands of flex wire and the connectors inside the beads so they don't show or detract from the whole design.


Monday, July 13, 2009

Floral Cascade Necklace


This is one of the jewelry pieces I entered into the Shuswap Lake Festival of the Arts.  The reason I like to create pieces for various challenges is that it forces me into areas I normally wouldn't go and to experiment and try new things.

I find that while working on each challenge I seem to end up at some point with an ahh hah moment.  With this one in particular, I wanted to totally disguise the clasp.  I've created many of these hidden barrel clasps before, but this time I didn't want any of the wires to show and because it was going into such an important event, I wanted it to be perfect.  I played around with it for a while until I finally came up with a solution and everything then fell into place and fit perfectly!  At that point it was very exciting for me and a real feeling of satisfaction!


I find that in each challenge piece I create, inspiration for more new projects evolve out of them and it drives me on to try more new things.

Saturday, July 11, 2009

WooHoo!


The opening ceremonies of The Shuswap Lake Festival of the Arts was last night.  My heart skipped a beat when I saw the blue ribbon on my mosaic tiled table!  This is the first time I've entered a juried art show.  There were two categories -- 2d  (photographs, paintings) and 3d  (glass work, sculpture, clay, wood, etc.).  I entered four pieces -- 2 necklaces, a hair barrette and my year long project of refinishing and creating a mosaic tile surface on an antique table I had found.  There were more than 400 entries in the show with many beautiful works of art as there is quite an artist community in the area, so I feel honored to have received such recognition for my work.


Thursday, July 9, 2009

Shuswap Lake Festival of the Arts


I am participating in the Shuswap Lake Festival of the Arts this year so our Art Fire Studio will be closed until July 21.

There is a lot of beautiful work, all from local artists, so you may want to consider dropping by if you are in the area.  I will be demonstrating my millefiori canes on Saturday, July 11th from 2:00-4:00 pm.

I will update you on how the show is going throughout the week.  In the meantime, you can view our entire collection if you click on the "Wearable Art Gallery" & "Jewelry for the Home" links on the right.

Monday, July 6, 2009

A New Challenge in Pastels

Our Art Fire Polymer Clay Smooshers Guild is having another challenge -- this one is to create something in pastel colors.  There are a lot of participants this time and some great entries.  Check them out and vote for your favorite!  (Just click on the link above) Voting closes midnight on Friday - July 10th.

Saturday, July 4, 2009

Color Blending


Last week I showed you how I mix my colors.  Now I will show you how I take several colors and gradually blend them into one another like a rainbow.

I first make sheets of each clay color with my pasta machine so they all come out the exact same thickness.  I cut them so the colors match up at an angle.  This is so the red and blue will each blend into the white.  I then take my clay and run it through my pasta machine so it comes out as a solid piece.


I take that sheet of clay and fold it in half, keeping the lines all going the same direction, and then I put the fold sheet of clay through the pasta machine again.


I do this many times -- fold in half and run through the pasta machine until the colors start to run together and create a gradual blend.  Here is the sheet that is blended.  But I want to stretch the colors out more so I fold the sheet in half but this time the opposite direction.


I then run that clay again through my pasta machine so it comes out in a long strip.


Next time I will show you how I turned this blended piece of clay into these flowers:


Thursday, July 2, 2009


Was seeing fireworks last night -- outside that is!  There was lots of celebrating on Canada Day everywhere and last night ended with a concert and fireworks in the park on the beach which we enjoyed from the comfort of our own deck outside our home.  Most of the fireworks were behind the trees so they looked like they were on fire and throwing sparks.